SuiteCRM BI-Directional link to Xero Automated BI-DIRECTIONAL synch between SuiteCRM and Xero, synch most recent record. Accounts, Contacts, Invoice and Products, connect and forget. Synch based on your criteria. This module also gives you the ability to manually update Accounts/Contacts/Invoice records to/from Xero
Installation Guide
There are a number of steps that you will need to perform BEFORE you install and configure the Suite to Xero module. Your installation should be completed in the following order/manner
- Create a new Application in Xero: Go to https://developer.xero.com and click on the MyApps tab. Create a new App, give it an App name and the URL of your SuiteCRM installation. Enter your OAuth 2.0 redirect URI. It should be your site URL with the following appended to it: /index.php?entryPoint=XeroCallBack As an example the full URI could be https://mysuitecrmsite.com/index.php?entryPoint=XeroCallBack.
- Create a Client Secret. Copy the App Name, Redirect URI, Client ID and Client secret fields. You'll need those values when setting up the Suite to Xero module in SuiteCRM
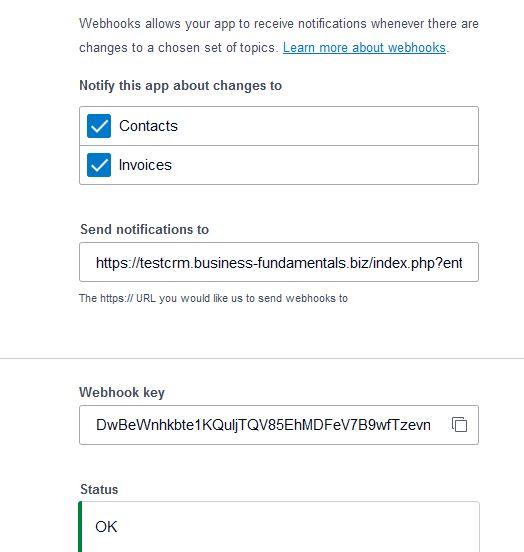
- If you want Xero to synch records BACK to your Suite installation you need to create a webhook. In your Xero application look for the Webhook menu option to your left. In the Send notifications to box enter your full site URL followed by /index.php?entryPoint=xeroWebhooks. Create and save the Webhook key, you need to enter it in your Suite Xero Configuration settings field. You will also need to check the Status of your connection. This connection CAN NOT be set until you have completed your Suite to Xero configuration AND connected to Xero. This process can be problematic at times, so please be patient, it's a Xero thing
 4. Install the Suite to Xero module in your SuiteCRM installation, enter your Suite to Xero key and validate the installation
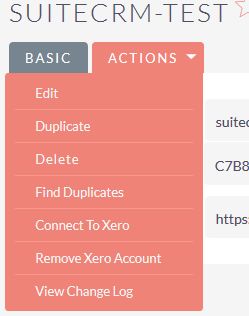
5. After validation you should be redirected to the Xero Configuration screen. Create a NEW configuration using the values you saved from steps 2 & 3. Save the new Xero Configuration. In Detail view, select the Actions menu -> Connect to Xero option. If there are ANY problems at this step, please check the entries that you have made in the Xero Configuration module. For more details see our SuiteCRM Configuration page
 6. NOTE If you need to change the Xero application that you are connected to, DELETE the current Xero Configuration and create a new one, Save the new record and from the Actions menu, click on the Connect to Xero link OR use the Remove Xero Account link, update your current settings and reconnect to your new App
 7. Run an Admin QRR IMPORTANT Scroll to the bottom of the screen and implement any SQL that is generated there. This step MUST be implemented for the Invoices and Products modules to work correctly
8. Check your Accounts, Contacts, Invoices and Quotes modules views to ensure you have the correct fields in your preferred locations. You may want to add the Xero Expense Codes field to your Detail/Edit view in the Invoices module, see our Admin guide for more details and recommendations
IMPORTANT If you are using the Suite to Xero module to process large numbers of records to Xero you may need to increase your PHP (max_execution_time) settings to allow the time taken to process each record OR break the process down into smaller numbers of records at a time.
NOTE The installation does make changes to some custom Account/Contact/Invoice/Quotes views (edit/detail/list views). You should be warned of those changes on installation. Your original views are saved in their respective custom folders. Recovery options are outlined in our SuiteCRM Installation page and our FAQ.


