Boost sales efficiency with SuiteCRM Integration for Gmail. Link emails, and manage data & tasks directly from your inbox.
Installation Guide
Compatibility
SuiteCRM 7.13.x - 8.9.x
Pre-Requisites
- A SuiteCRM instance of a compatible version
- A Gmail account
Installation
SuiteCRM Plugin
- Go to Module Loader from the Admin Panel.

- Upload the downloaded package and install it.
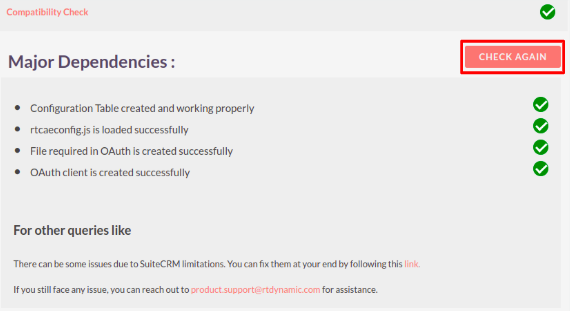
- After the installation is complete, you will be redirected to CRM Assistant Configuration page, where a Compatibility check is run. If everything is in order, you should see a green check mark. If there is an issue, there will be an error message next to the dependency that was not met. You can click Check Again to run the check once more.

- If the compatibility check is successful, click Validate Key. Enter your license key in the given field, and click Validate.
- Under Enabled Users, drag desired users to the right column. You can enable all users at once by clicking the button at the top. The number of available users and enabled users appears on the right.

Gmail Add-On
- Download the CRM Assistant for Gmail™ Add-On from Google Workspace Marketplace.
- From your Gmail, open the add-on by clicking on the icon in the side panel.
- You will be presented with the login screen. Enter your CRM instance URL, username and password, and click Connect to SuiteCRM.
- You will be directed to the home screen. Congratulations, you have successfully set up CRM Assistant!
Uninstallation
Uninstall the SuiteCRM Add-on
To remove the plugin from SuiteCRM, go to Admin - Module Loader and click on the Uninstall button next to CRM Assistant.
Uninstall the Gmail Add-on
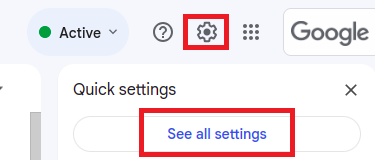
To remove the add-on from Gmail: 1. Open Gmail. 2. Click the gear icon, then See All Settings.
- Select Add-ons from the tabs.
- Click Manage.
- Click the three dots on the add on.
- Select Uninstall.
- Click Uninstall App in the next prompt.


