SuiteCRM Dynamic Forms enables you to create multiple forms with different purposes for any record. This is great for a number of various industries which requires multiple types of forms be attached to each customer's records. Dynamic forms has the ability to add many types of fields to your forms custom forms.
User Guide SuiteCRM 7.x
Steps For Using Dynamic Forms Features :
Step 1:
To open the Administration Page, Click on Admin tab, as shown in below screenshot.

Step 2:
Open Administration page, Click on Dynamic Forms from the Other section.

Step 3:
On click of “Dynamic Forms” link, open the Dynamic Forms Dashboard as shown in below screenshot.

Step 4:
On Dynamic Forms Dashboard page, click on “Design Dynamic Forms” link to open Design Dynamic Forms Configuration page.

Step 5:
In Design Dynamic Forms page, Click on “CREATE” link.

Step 6:
On click of CREATE link, Design Dynamic Forms page will be open, as shown in the below screenshot.
Select Module:

If “Generate External Url” Checkbox checked then it’ll display as shown in the below screenshot.

Design Dynamic Form:

On click of “+ ADD QUESTIONS” button, Popup will be open as shown in the below screenshot.

Dynamic Form Style:

Automation Trigger:

Dynamic Form Alerts:

Step 7:
Enter all the values and click on SAVE button to save record, as shown in the below screenshot.
Select Module:

Design Dynamic Form:
ADD QUESTIONS:


To Update question, click on pencil icon as shown in the below screenshot.

To delete question, click on delete icon as shown in the below screenshot.

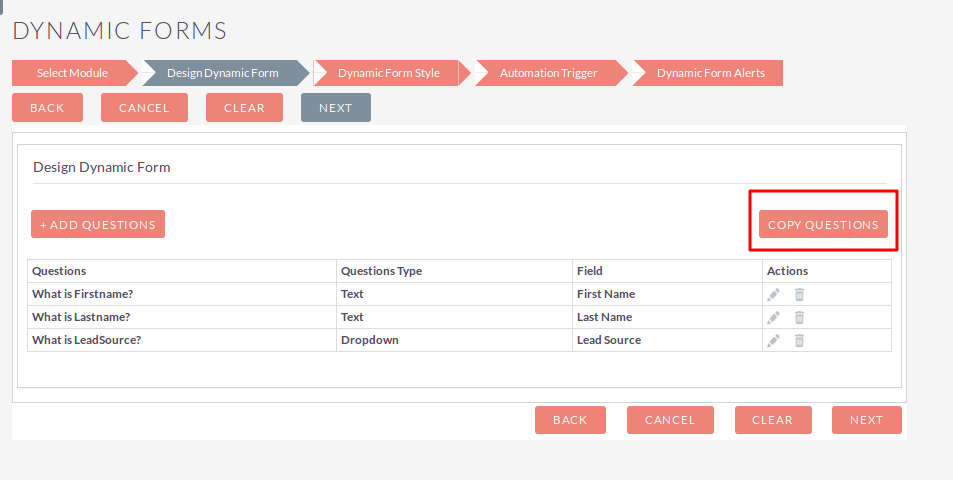
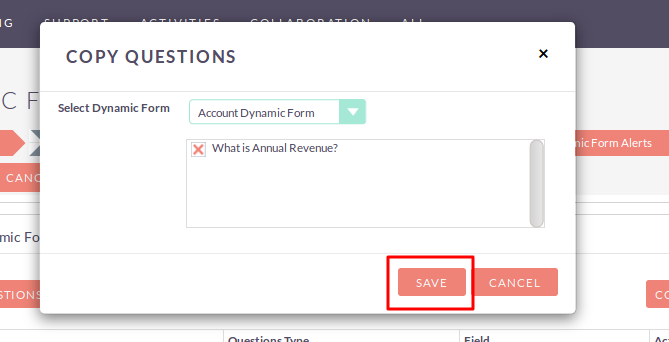
Click on “COPY QUESTIONS” button to copy questions from another module Dynamic Forms Questions.


Dynamic Form Style:

Automation Trigger:

Dynamic Form Alerts:

Note : Once you’ll save Dynamic Forms configuration for particular module, you will need to repair & rebuild your CRM. You need to repair & rebuild CRM because our plugin will add Dynamic Forms Subpanel for particular module at time save Dynamic Forms Configuration. This process you need to follow when you’ll add new configuration for particular module. No need to follow this process when you’ll edit configuration for particular module.
For Repair & Rebuild, Go to Admin->Click on Repair->Click on Quick Repair & Rebuild
For Example, If you’ll add Dynamic Forms configuration for Lead Module then Subpanel of Dynamic Forms will be added in Lead Module
Step 8:
To Update record, click on pencil icon as shown in the below screenshot.

Step 9:
To open external url of dynamic form, click on “COPY URL” button and paste url in new window as shown in the below screenshot.

Step 10:
To delete one or multiple Dynamic Forms records, you can select records using the checkbox option on the left hand side of the listview and Click on DELETE to delete record(s).

Step 11:
To open Dynamic Forms Dashboard, click on BACK button as shown in the below screenshot.

Step 12:
To add Dynamic Forms for Contact Module Record, Open Detail View of particular Contact and click on “Dynamic Forms”.

Step 13:
On click ”Dynamic Forms”, Popup will be open for Dynamic Forms selection. Select Dynamic Forms and click on “SAVE” to add Dynamic Forms for Contact Module Record.

Step 14:
After add Dynamic Forms, click on Dynamic Form Name.

Step 15:
On click Dynamic Form Name, If in configuration Display From is “Popup” then open as a popup inside module as shown in the below screenshot.

If in configuration Display From is “New Window” then open in separate window as shown in the below screenshot.

Step 16:
Fill up answer of questions and click on “SAVE” Button. Once you’ll click, it’ll add your answer to Map Field which you’ve configure in Configuration and Alert will be trigger if automation trigger conditions match as defined in configuration to perform Email/Workflow/Reassign record actions.

Step 17:
On Dynamic Forms Dashboard page, click on “Dynamic Forms Reports” link to open Dynamic Forms Reports Configuration page.

Step 18:
In Dynamic Forms Reports page, Click on CREATE link.

Step 19:
On click of CREATE link, Dynamic Forms Reports page will be open, as shown in the below screenshot.
Select Dynamic Form:

Report Filter by Fields:

Report Filter by Questions:

Step 20:
Enter all the values and click on “SAVE AND GENERATE REPORT” button to save record, as shown in the below screenshot.
Select Dynamic Form:
If Report Type is Export then display as shown in the below screenshot.

If Report Type is Schedule then display as shown in the below screenshot.

Report Filter by Fields:

Report Filter by Questions:

Step 21:
On click of “SAVE AND GENERATE REPORT”, Report will be as below screenshot. (If Report Filter by fields and Report Filter by Questions configuration match as defined)

Step 22:
Click on “PDF” button to Export Dynamic Form Report in pdf file format.


Step 23:
Click on “EXCEL” button to Export Dynamic Form Report in excel file format.


Step 24:
To Update record, click on pencil icon as shown in the below screenshot.

Step 25:
To delete one or multiple Dynamic Forms Reports records, you can select records using the checkbox option on the left hand side of the view. Click on DELETE to delete record(s).

Step 26:
Also you can export Dynamic Form Report from the listview of Dynamic Forms Reports.


