Avaya Integration is a computer telephony integration between SuiteCRM and Avaya PBX. Add-on supports PBX "Avaya IP Office"
Installation Guide (Avaya side)
1. System Requirements
You should install PBX-connector application on the server connected to the same LAN as Avaya PBX.
PBX-connector system requirements:
- Server is running under Windows 7, Windows 8, Windows Server 2008, Windows Server 2008 R2, Windows Server 2012
- Avaya IP Office 500
- Avaya IP Office TAPI 3 Driver
- Avaya CTI Link Pro license
- Avaya VoiceMailPro license for audio recording
- Microsoft WindowsInstaller 3.1
- Microsoft .NET Framework 2.0
Note! The [Incoming call pop-up] and [Smart transfer] features don't work if your PBX can't detect the Caller ID on external phone lines.
2. Please check before installation
- Server satisfies the system requirements
- You have administrator level access to the server
- You have the All-In-One_CTI_Avaya.exe installation package (download here: http://www.prostiezvonki.ru/installs/All-In-One_CTI_Avaya.exe)
You have trial lisence (you can use public trial license "WXSTC92443967382818044421" or ask for personal trial license by email a@vedisoft.ru)
3. Avaya IP Office TAPI 3 Driver Installation
Before installing TAPI driver make sure you have IP Office CTI Link Pro license active on your PBX. Contact your Avaya partner to purchase the license or get a 60-days free trial.
After CTI Link Pro license is active then you can proceed with TAPI driver installation.
For the purpose of this guide we use the IP Office TAPI 3 Driver v1.0.0.40.
Note! Please use only the TAPI driver that supports you Avaya PBX model.
Run the proper Avaya TAPI Driver installation program and follow the instructions. When installation is completed update the TAPI Driver settings:
1) Open Windows Control Panel [Phone and Modem Options]:
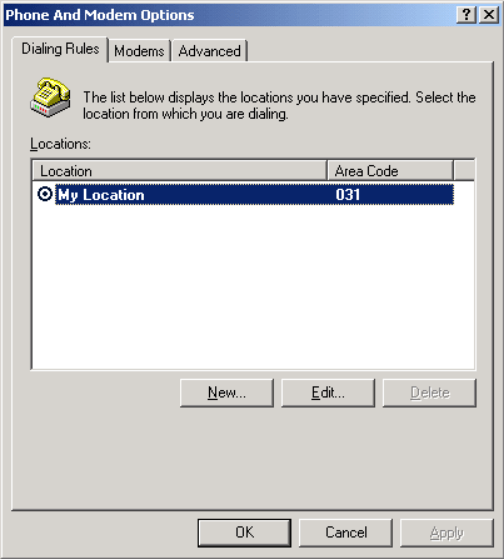
2) Create new location if the Locations list is empty or edit the existing location in the following way: the [Number to access the outside line] should be same as one defined on your Avaya PBX:

3) Change to [Avdanced] tab and select [Avaya IP Office TAPI3 Service Provider] :
4) Click [Settings] button:
5) Enter you Avaya PBX IP address in [Switch IP Address] field. Select [Third Party] and enter your Avaya PBX password in [Switch Password] field (this is the same password you use in IP Office Manager).
6) After you made the above changes please restart Windows.
4. PBX-connector Installation
Run the All-In-One_CTI_Avaya.exe installation package and follow the instructions.
5. PBX-connector configuration
Open the PBX-connector configuration file config.txt in text editor. You can find configuration file in a folder where the PBX-connector is installed, for example: C:\Program Files\Vedisoft\All-In-One CTI - Avaya
PBX-connector basic settings
1) Define the port parameter. PBX-connector listens on that port for incoming connections from CRM plug-ins.
Note! PBX-connector receives the incoming TCP connection from CRM plug-ins on that port. If Windows firewall or 3-rd party firewall/antivirus software is active then please update its settings to allow incoming TCP connection on that port.
2) For better security you can limit the access to PBX-connector by defining the client_id parameter. Client_id parameter is very similar to password – all the CRM plug-ins should provide correct client_id when connecting to PBX-connector.
3) Define the log file name with log_file parameter and log verbosity with log_level parameter.
4) Define the first digit of incoming call distribution group (ICD) numbers in group_starts_with parameter if there are ICDs defined on your PBX. By default ICD numbers start with "6".
5) PBX-connector can store the call history in special queue when there is no connection between PBX-connector and CRM plug-in. When CRM plug-in connects to PBX-connector then it receives call history from that queue.
If you want to use that queue you should define queue_max_length parameter value. For example if you want to store call history in that queue for last 24 hours then parameter value should be twice as large as the average amount of calls per 24 hours.
6) If you have dial out prefix on your PBX then define the outgoing_prefix parameter value. Default parameter value is "9".
7) For better security you can switch on the SSL encryption with use_ssl parameter. If switched on then all the communications between PBX-connector and CRM plug-ins will be encrypted.
Note! If you have the parameter value set to true, then you should use the wss:// prefix when entering connection string in your CRM plugin, for example: wss://192.168.0.6:10150. For the false parameter's value, use the ws:// prefix when entering connection string in your CRM plugin, for example: ws://192.168.0.6:10150
8) Paste the license key to the contract parameter value.
Note! If you didn't receive the license key please contact the Vedisoft support.
Note! PBX-connector verifies license key by submitting license key to Vedisoft's license server. If you have firewall installed please allow the PBX-connector to establish HTTPS connections to external web-sites.
Smart transfer configuration
You can use [Smart transfer] feature to transfer incoming calls to responsible employees automatically without IVR or secretary.
If you want to use the [Smart transfer] feature please do the following:
1) Switch the smart_transfer parameter to "on".
2) Define the smart transfer time-out (in seconds) in transfer_time parameter. If PBX-connector doesn't receive the extension number from CRM plug-in within that time, then it transfers call to the secretary extension number.
3) Define the secretary extension number with secretary parameter. You can use any of the following extension types:
- extension number
- incoming distribution call group number
- IVR number.
If parameter is empty then call remains on the same line.
4) You can use "Smart transfer" feature on specific external lines. Please define these external lines in the catch_list parameter.
Note! If you're going to use the "Smart transfer" feature then you should route all the incoming calls to "Operator" ("101" extension number by default).
Call recording configuration
You can record phone calls with the VoiceMailPro application for Avaya IP Office PBX. Contact your Avaya partner to purchase the VoiceMailPro application.
1) Enter the record_internal_path parameter value. It's a full path of folder that VoiceMailPro uses to store audio files.
2) Then define the call recordings external path in record_external_path parameter. You can establish different types of call recordings access for CRM users. For example, Windows shared folder (\avaya\records) or HTTP (http://avaya/records).
How does the "Incoming call pop-up" feature work?
Every CRM user has PBX extension number defined in CRM. So when use's phone is ringing the incoming call notification pop-up appears.
How do you disable call handling on certain external lines?
You can disable call logs and incoming call notifications on specific external lines by defining them in the ignore_list parameter value.
6. Running the PBX-connector
After you've installed the PBX-connector please restart your computer. PBX-connector Windows service should start automatically.
Check the PBX-connector is up and running:
1) Open the Windows [Services] snap-in: [Control Panel] – [Administration] – [Services[.
2) Find the [All-In-One CTI – Avaya] service.
3) Check that service state is [Started[.
You can start and stop PBX-connector service manually using the Windows "Services" snap-in.