Need a landing page for your next campaign? A way for your customers to create support cases? Do your sales reps need a way to enter leads? With WebToModule you can create custom webforms for these any many other users. Supports all modules, including custom modules.
User Guide
Creating a WebToModule Form
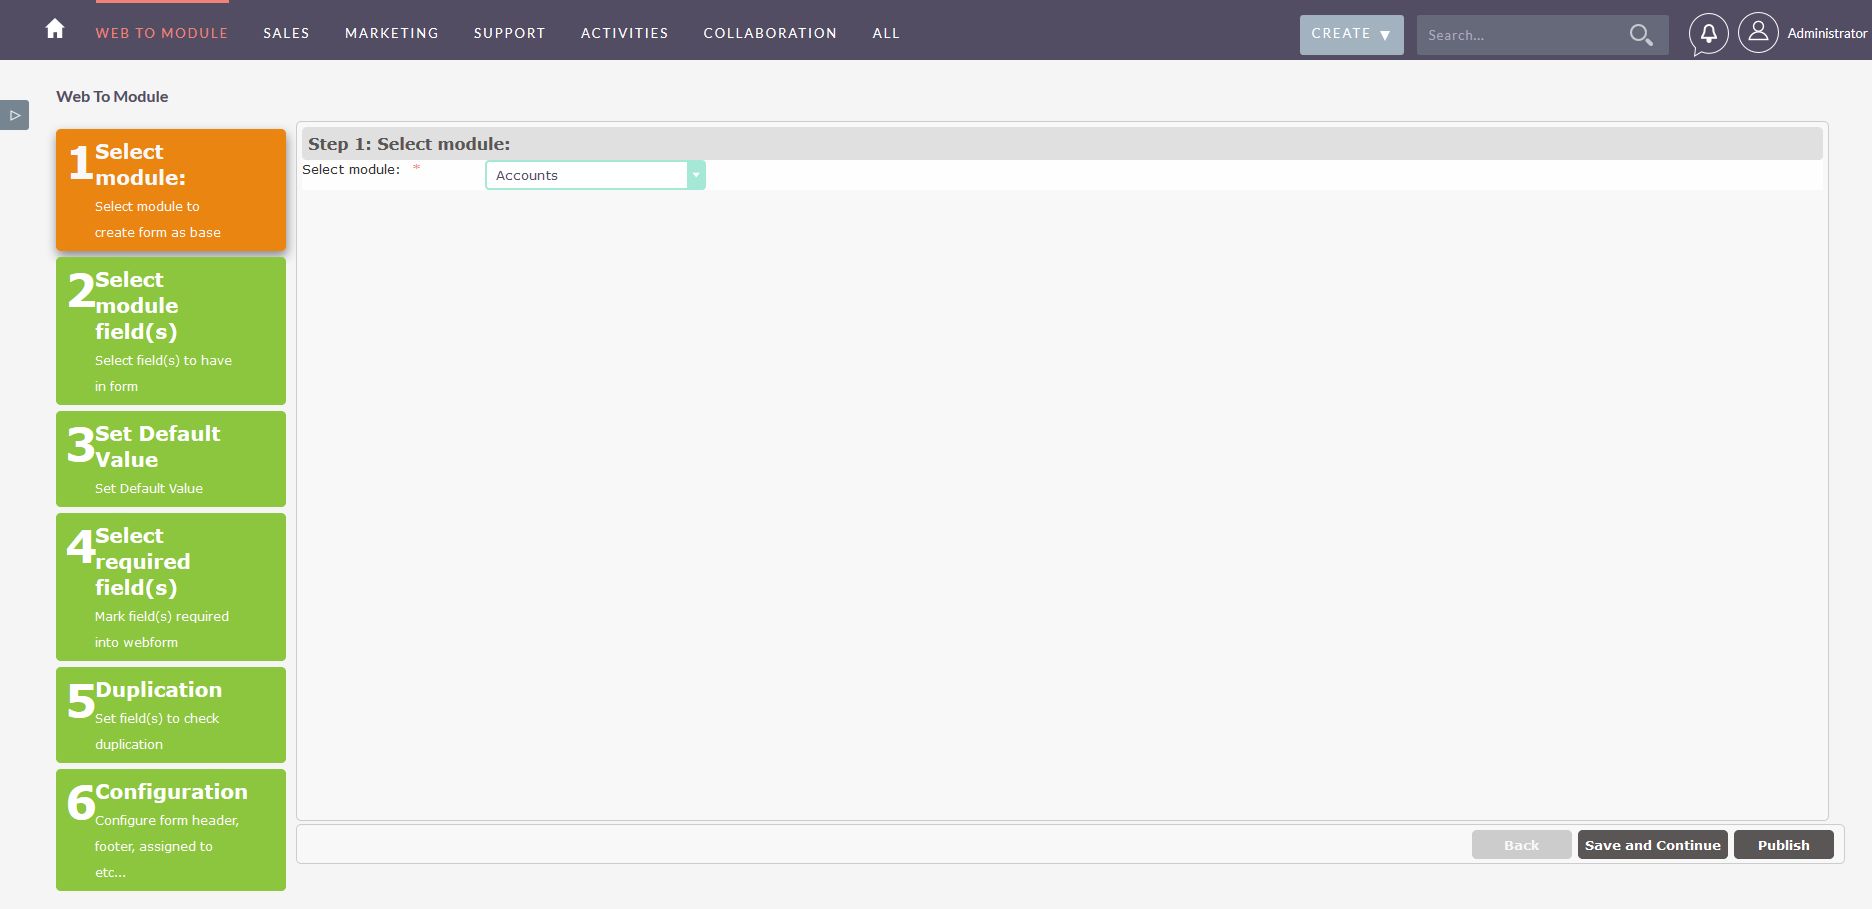
1) Select the module for which you want to generate the Web Form. The list of modules supports the built-in and custom modules, if any.
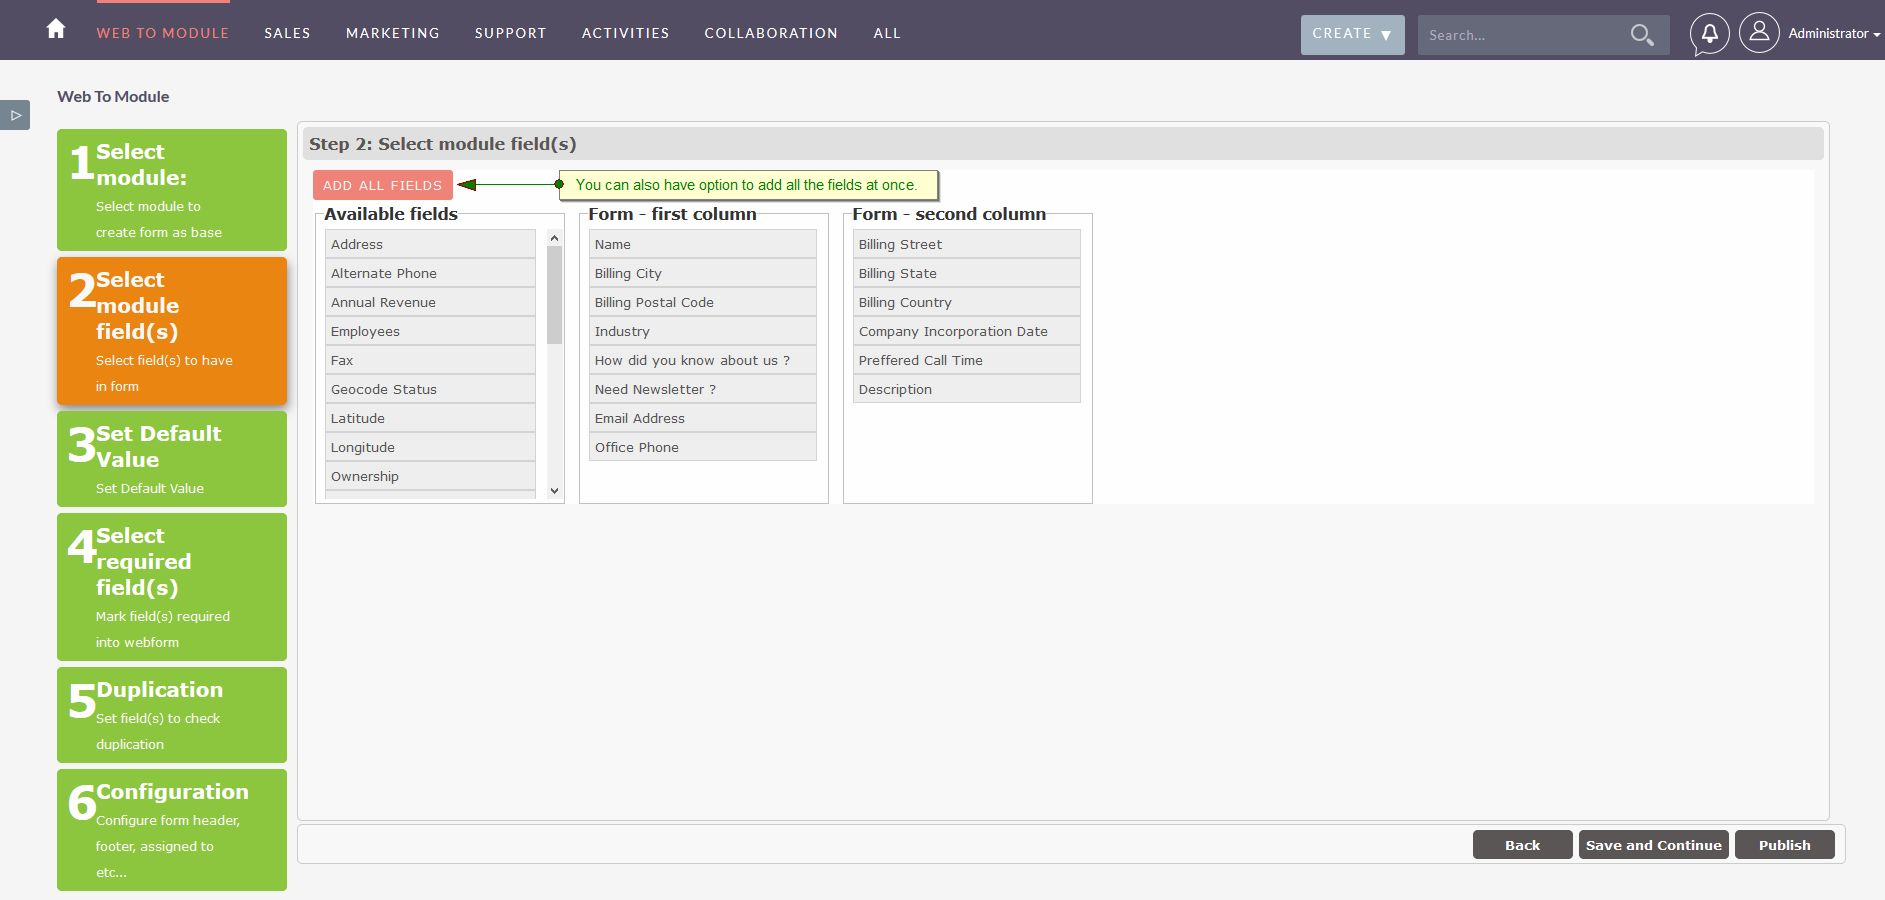
2) Select the field(s) you want to display on the Web Form.
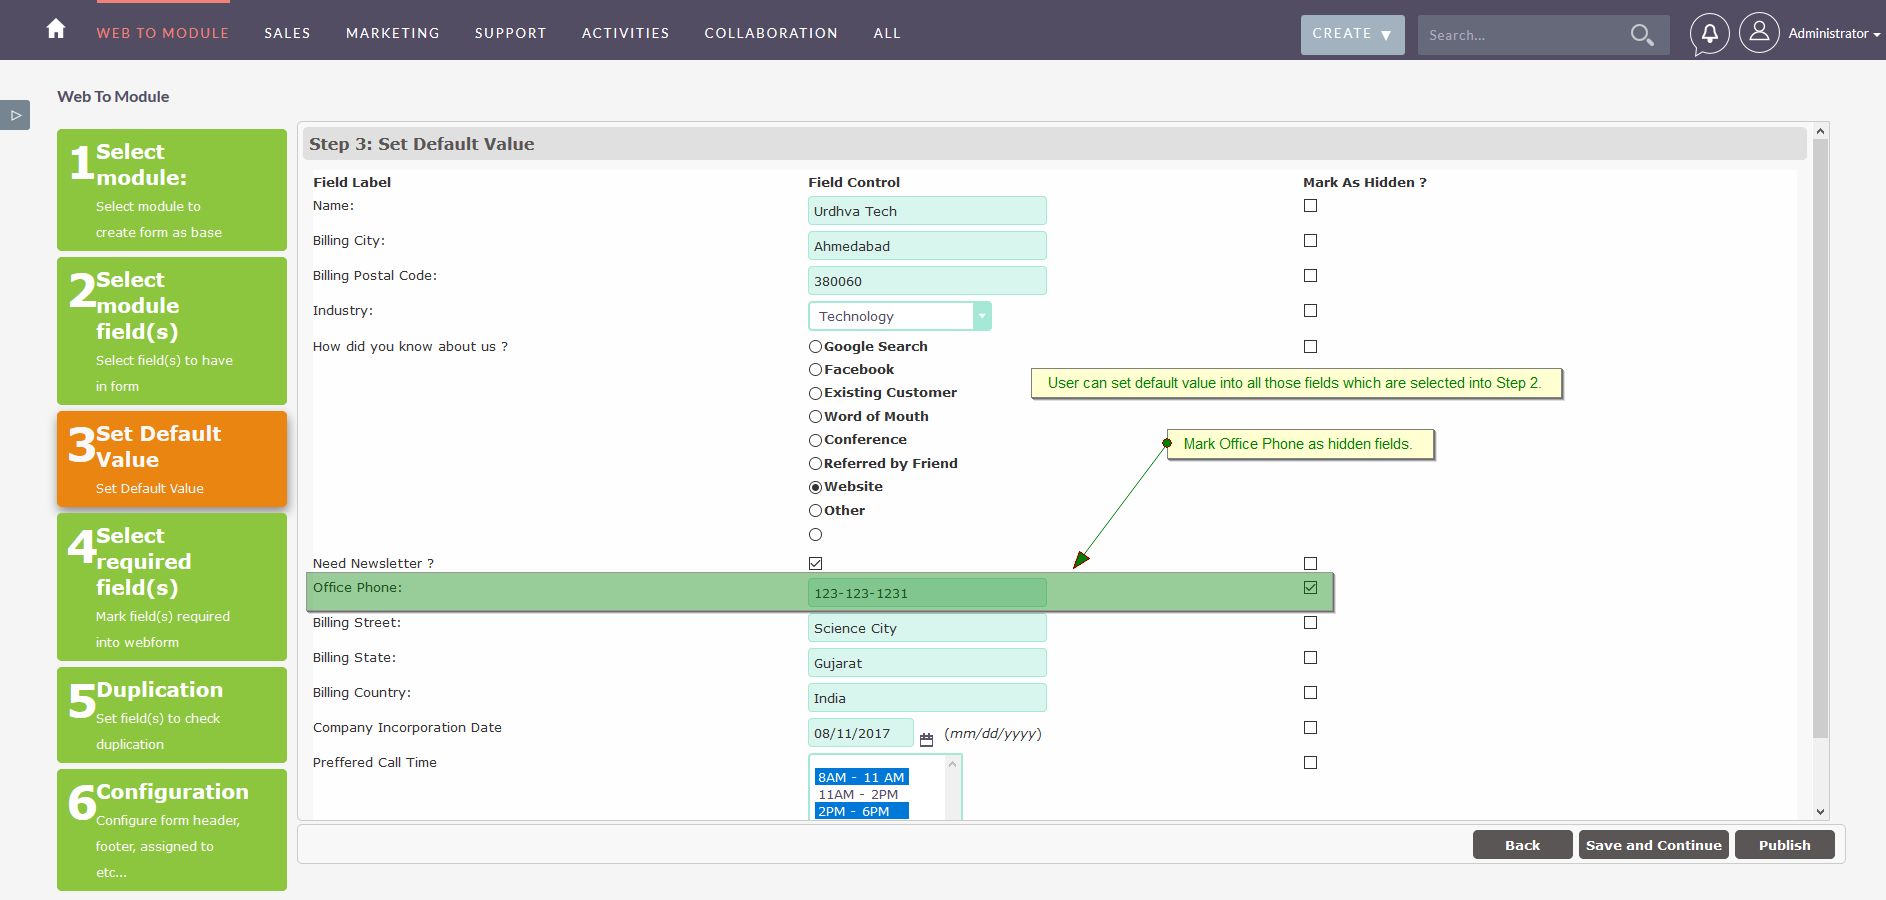
3) Set default value for fields which are selected into previous step. We can also mark field as hidden if we do not want user to change the value into WebForm. Hidden field will not be added into WebForm.
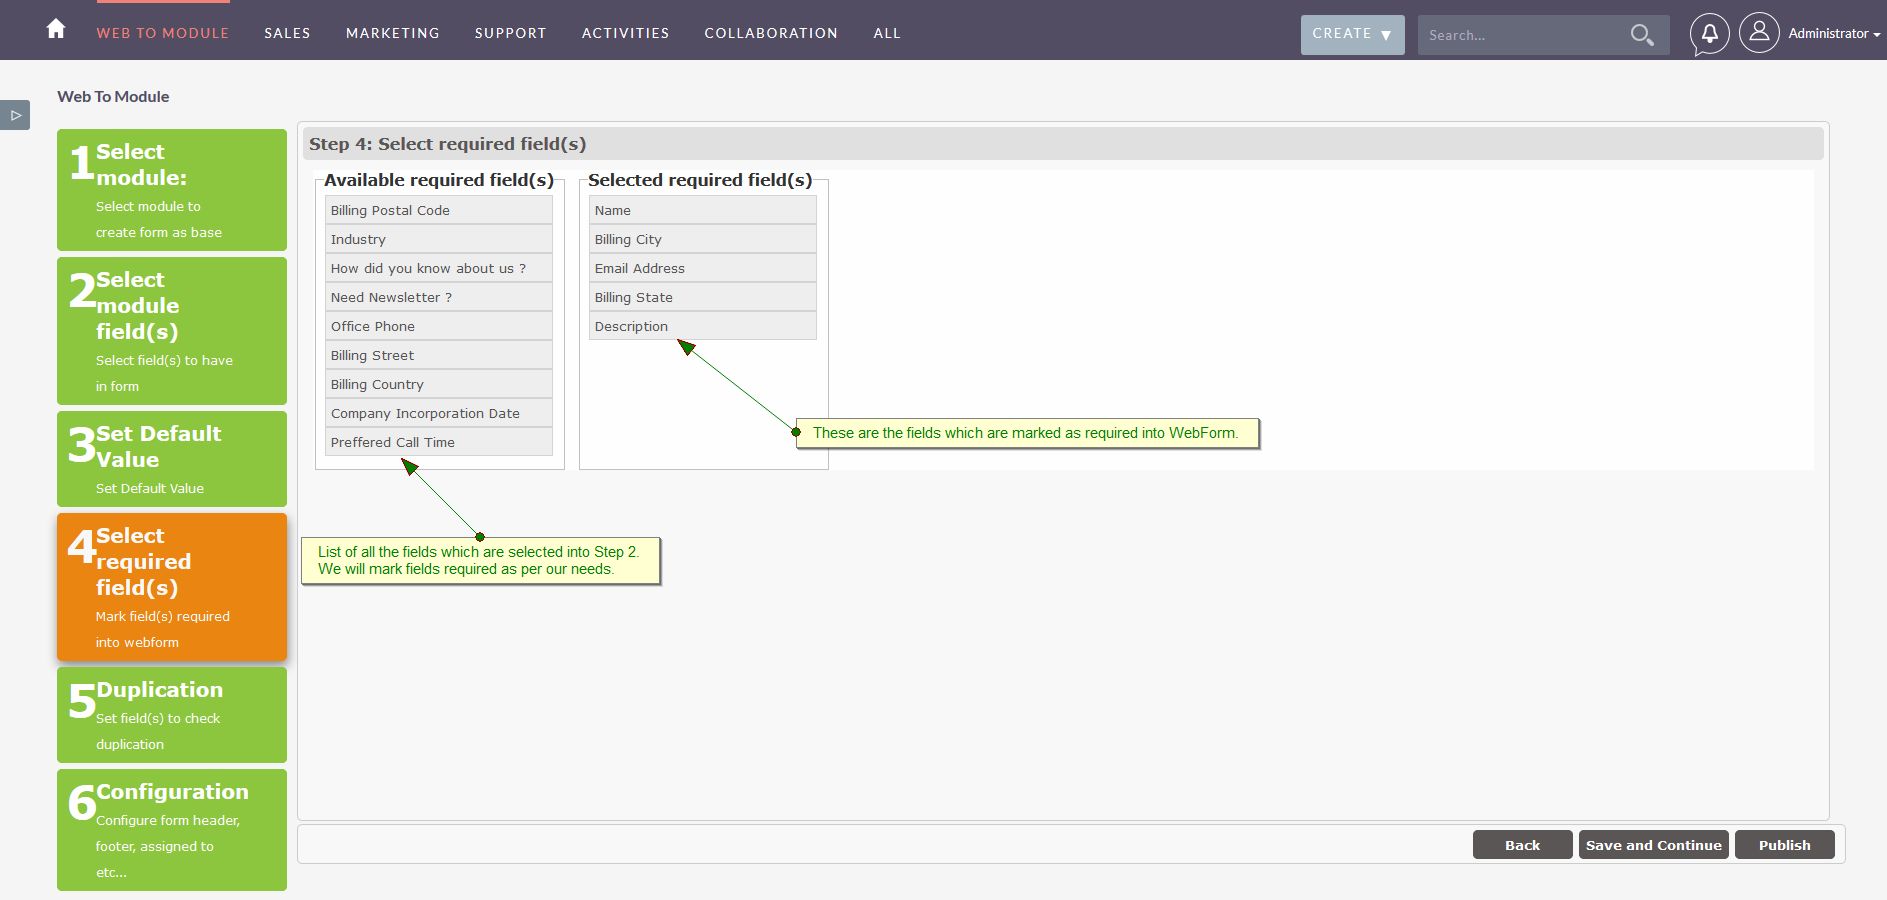
4) Out of the selected fields, mark the fields that have to be filled in compulsory.
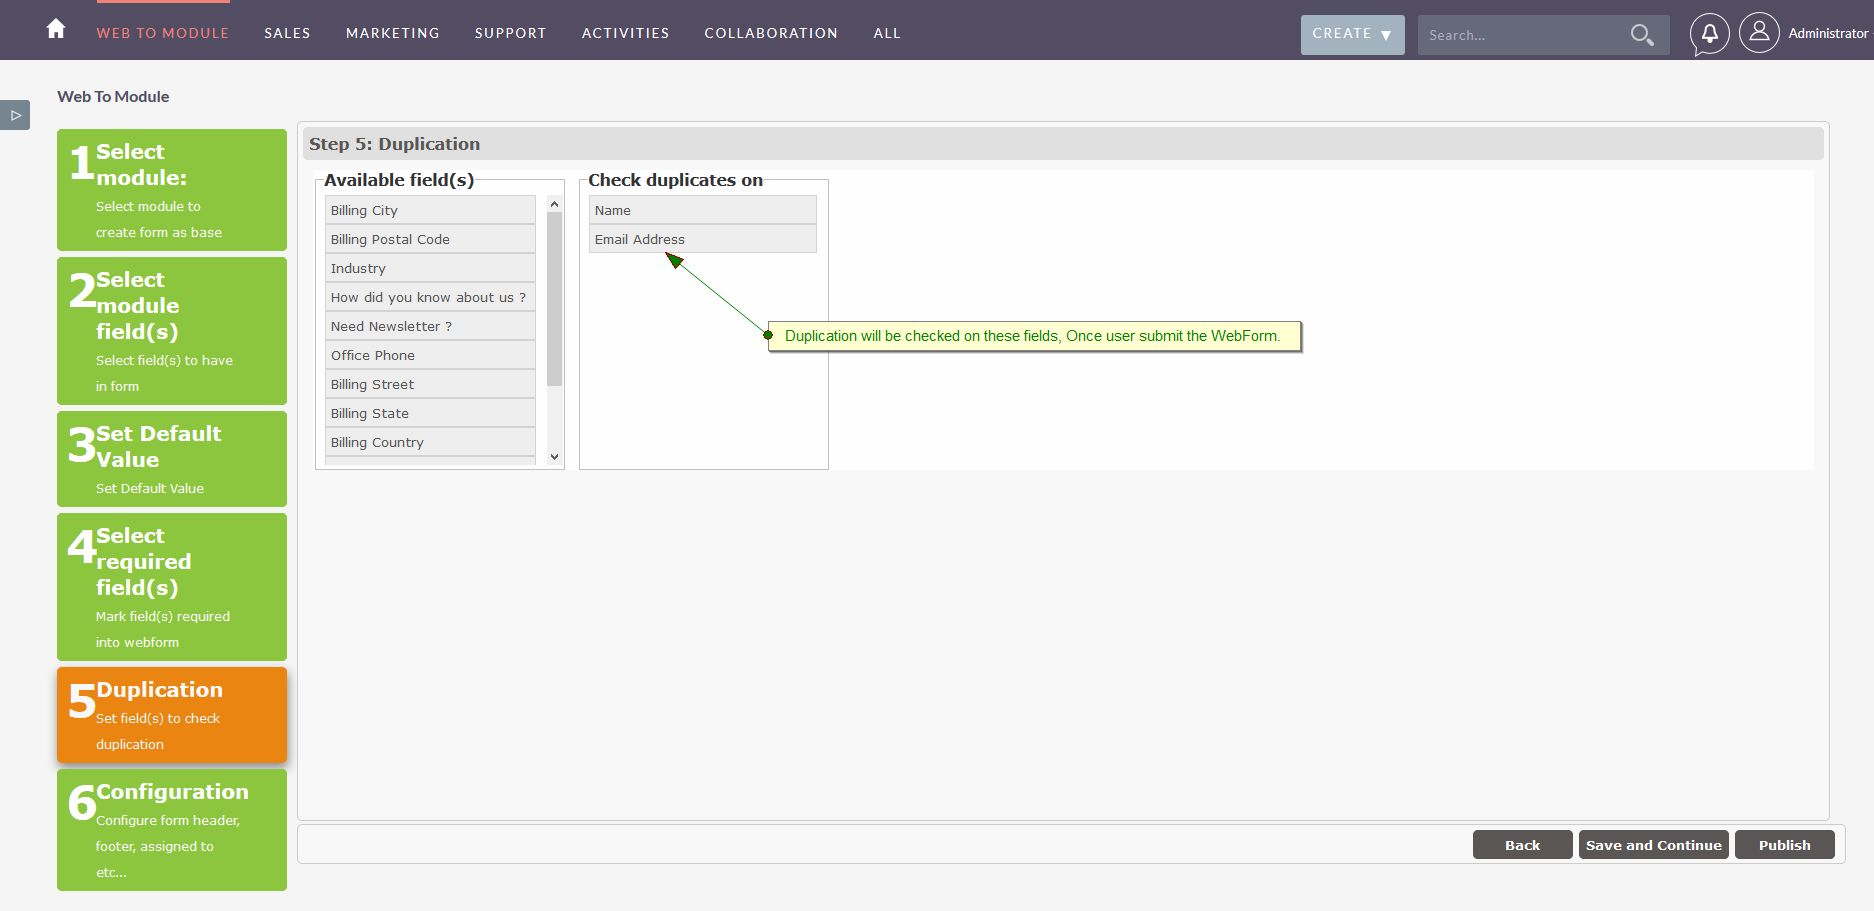
5) Select the field(s) that you want to check duplicates in CRM.
6) Add necessary details to WebForm like Form Header, Form Description, Submit Button Label, Auto-Response Template, Security Groups,WebForm Uoload URL, Enable Google reCaptcha, Redirect URL, Form Footer etc…
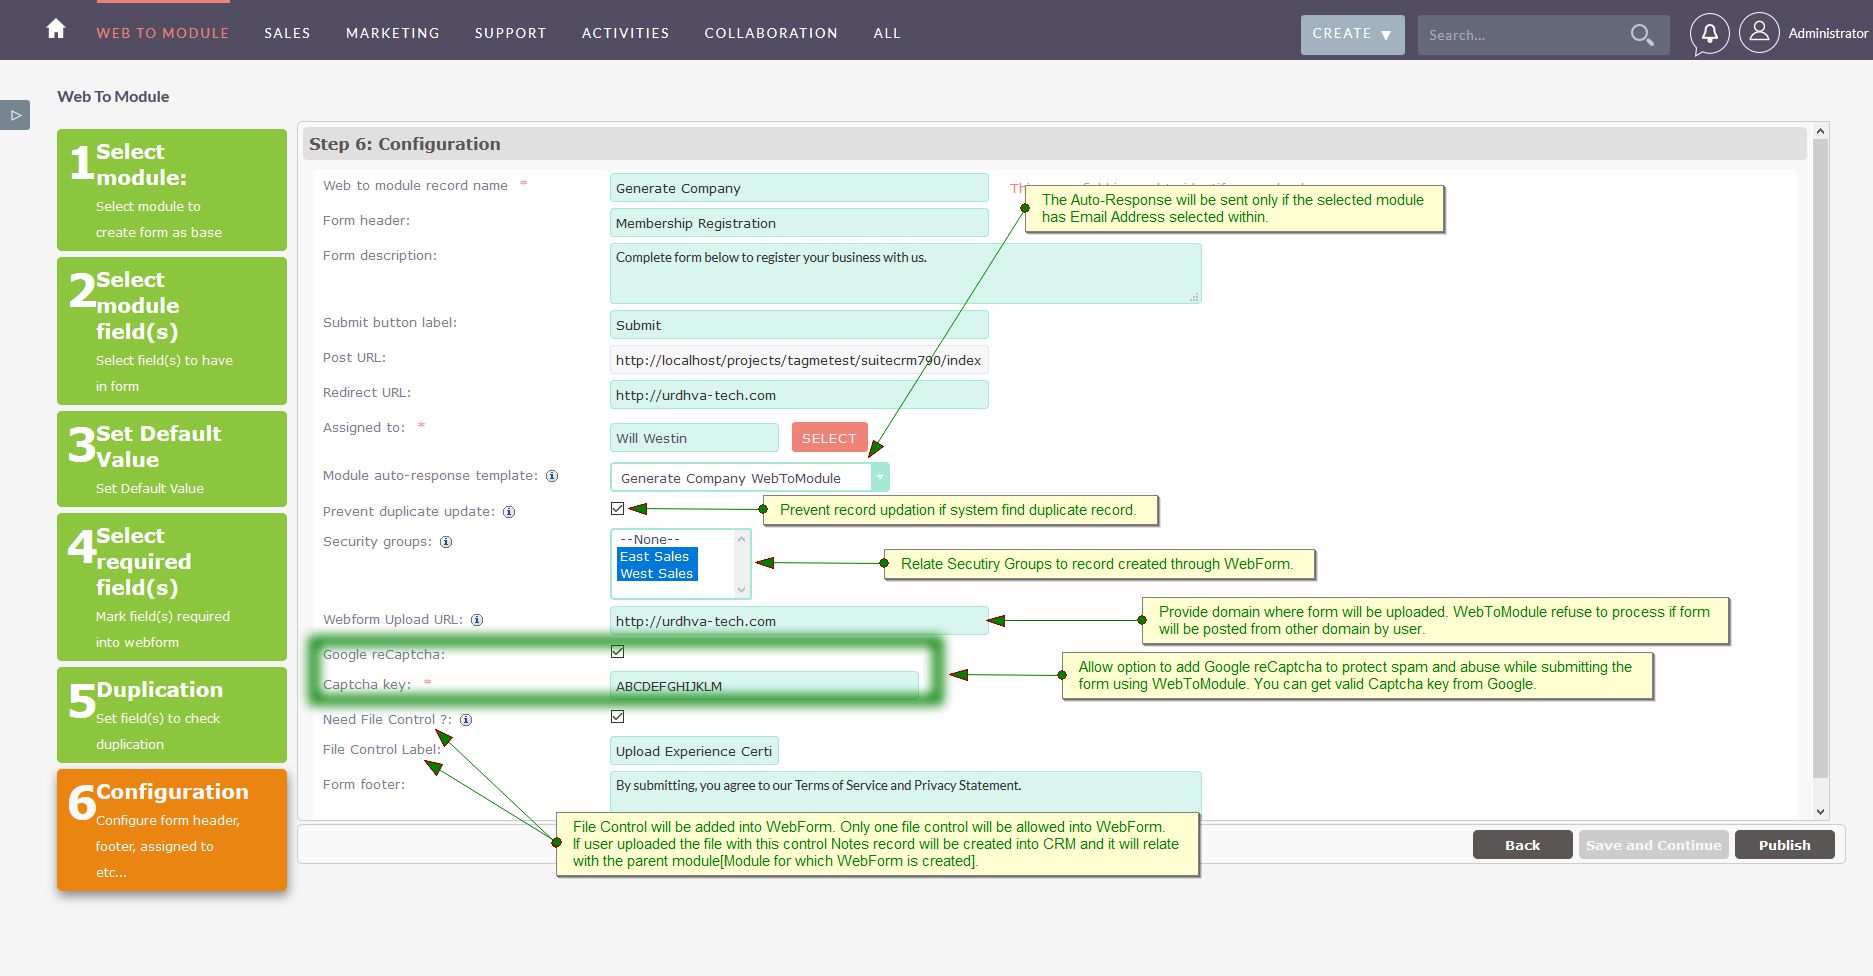
- Web to module record name: Name of the WebForm in CRM.
- Form header: Header of the generated form.
- Form description: Description content for the WebForm, Will be shown on the generated form.
- Submit button label: Label of the button that will be displayed on the form.
- Post URL: When visitor submits the form it will be posted to this URL. User cannot edit this URL as it needs to be fixed. Make sure your site_url variable is correct in config.php else it will be posted to wrong address.
- Redirect URL: After submission of the form. Users will be redirected to this URL with predefined status. If you wish to show them message or greet on successful submission, you will have status as shown below. A. “duplicate_found”: If prevent duplicate selected and duplicate found it will be redirect with status= ”duplicate_found” so you can show them appropriate message. B. “created”: When user submits the form and new record created, it will be redirected to URL with status=”created”. C. “updated”: If duplicate found and you have unchecked prevent duplicate. It will update the record and redirected with status=”updated”.
- Assigned to: Created/Updated record will be assign to specified user.
- Module auto-response template: Select the auto response email template to send email to the visitor upon form submission. Template will be parsed based on the selected module. Note: it will be send only if the module selected has email address in web form and not empty.
- Webform Upload URL: Provide the domain where form will be uploaded. WebToModule also process the request from sub-domain too. For Example, We have provided value http://urdhva-tech.com into "Webform Upload URL" field. Now if any users submit the form request from http://urdhva-tech.com or any other sub-domain like http://webtomodule.urdhva-tech.com then WebToModule accept it and process the request. If user submits the request from any other domain then WebToModule refuse to process.
- Google reCaptcha: Client side captcha validation to protect WebForm from spam. Check this if you want to have captcha enabled on your form.
- Captcha Key: Get the valid Google Captcha Key.
- Need File Control: File Control will be added into WebForm. Only one file control will be allowed into WebForm. If user uploaded the file with this control, Notes record will be created into CRM and it will relate with the parent module[Module for which WebForm is created].
- File Control Label: Text string for file control which will display into WebForm.
- Form footer: Footer of the generated form.
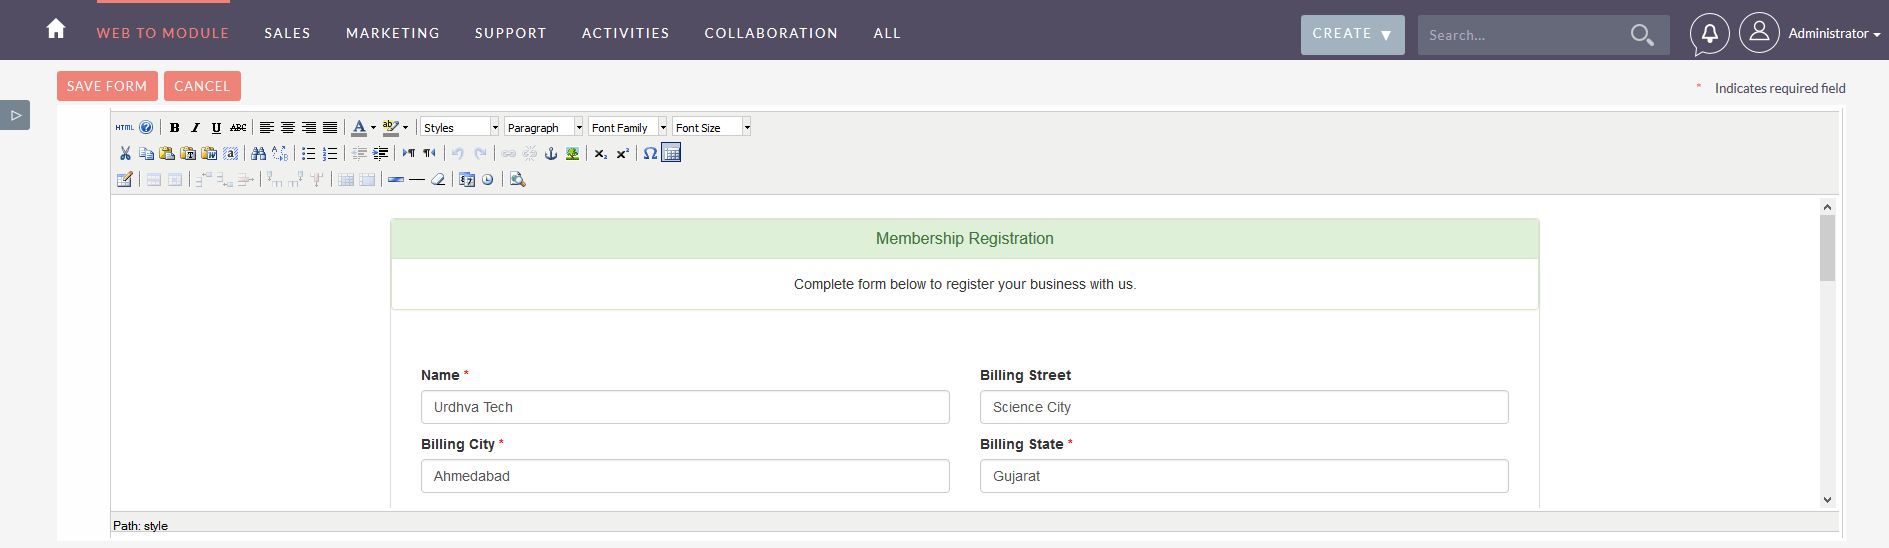
7) Preview your form. Default value is populated into it.
8) Download the WebForm from the ListView and DetailView.
The webforms exist in the /UrdhvaTechWebToModule directory of your SuiteCRM application and are named with the ID of the form record.

You can use this code to embed into your website as needed.
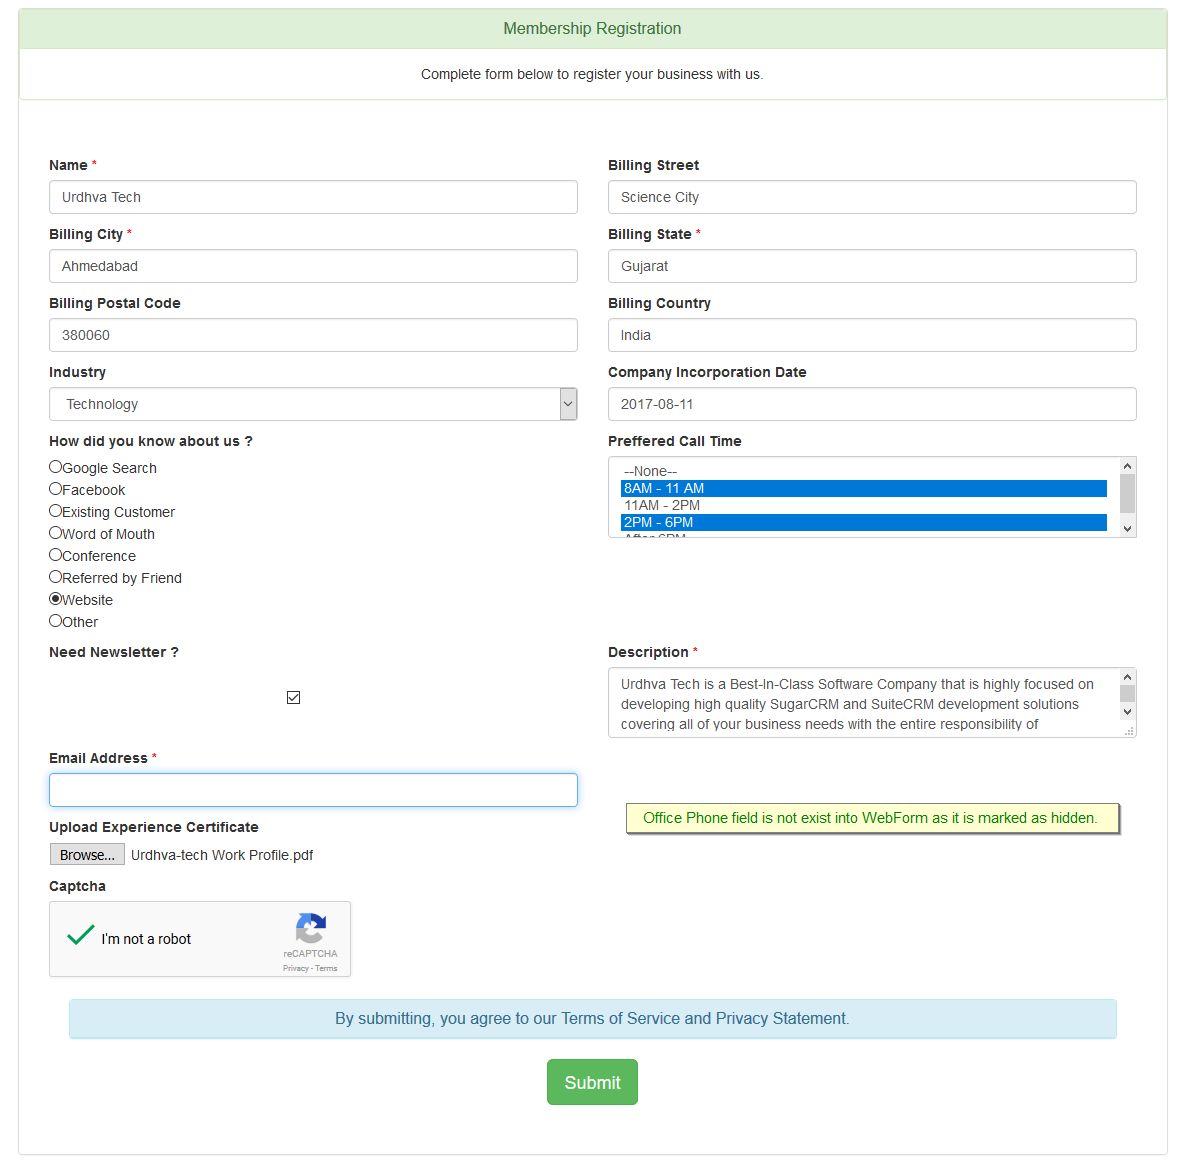
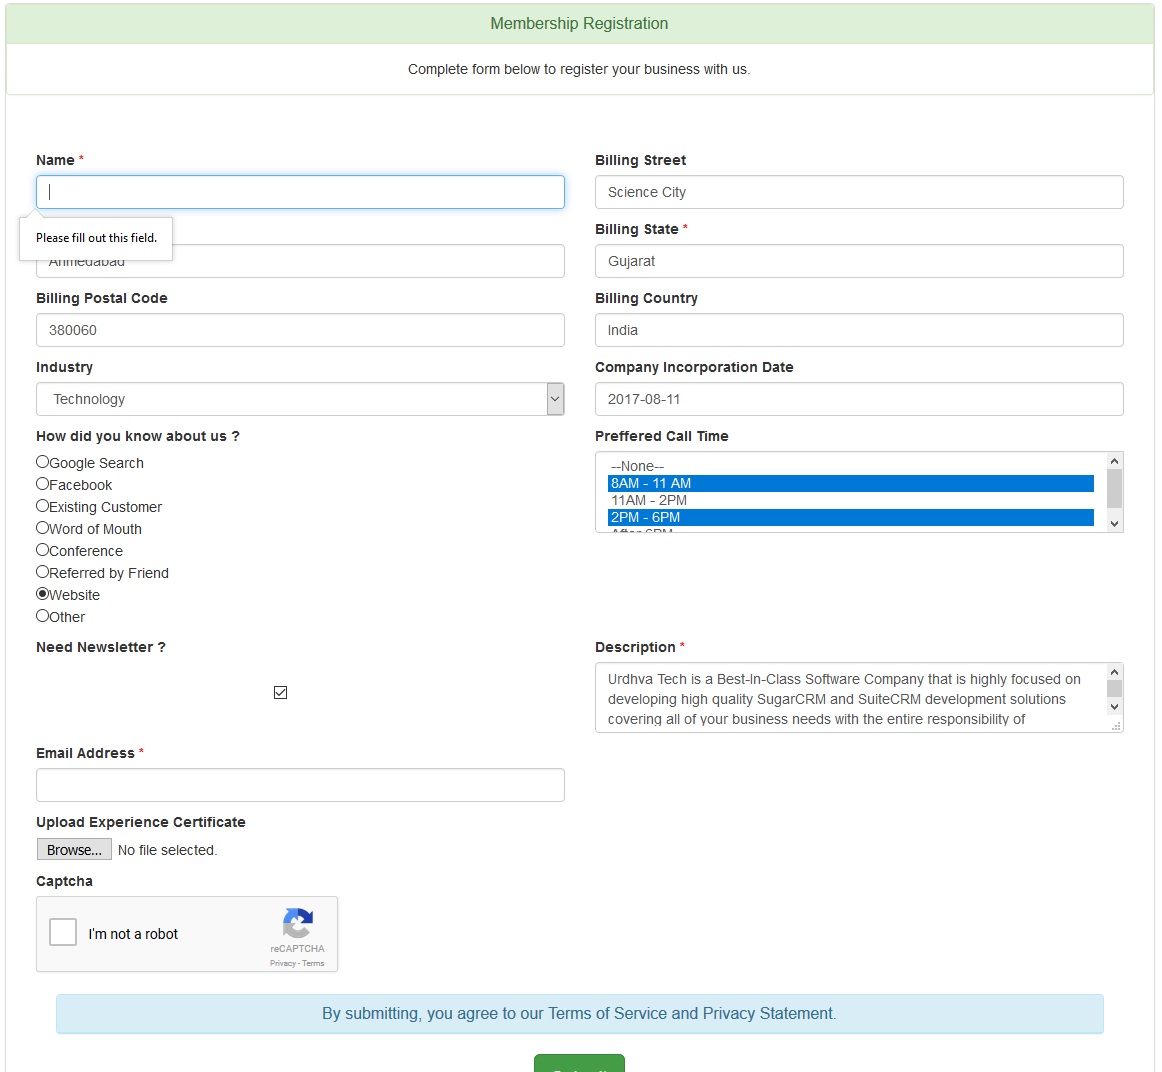
9) What the WebForm looks like in the browser
10) What required fields look like
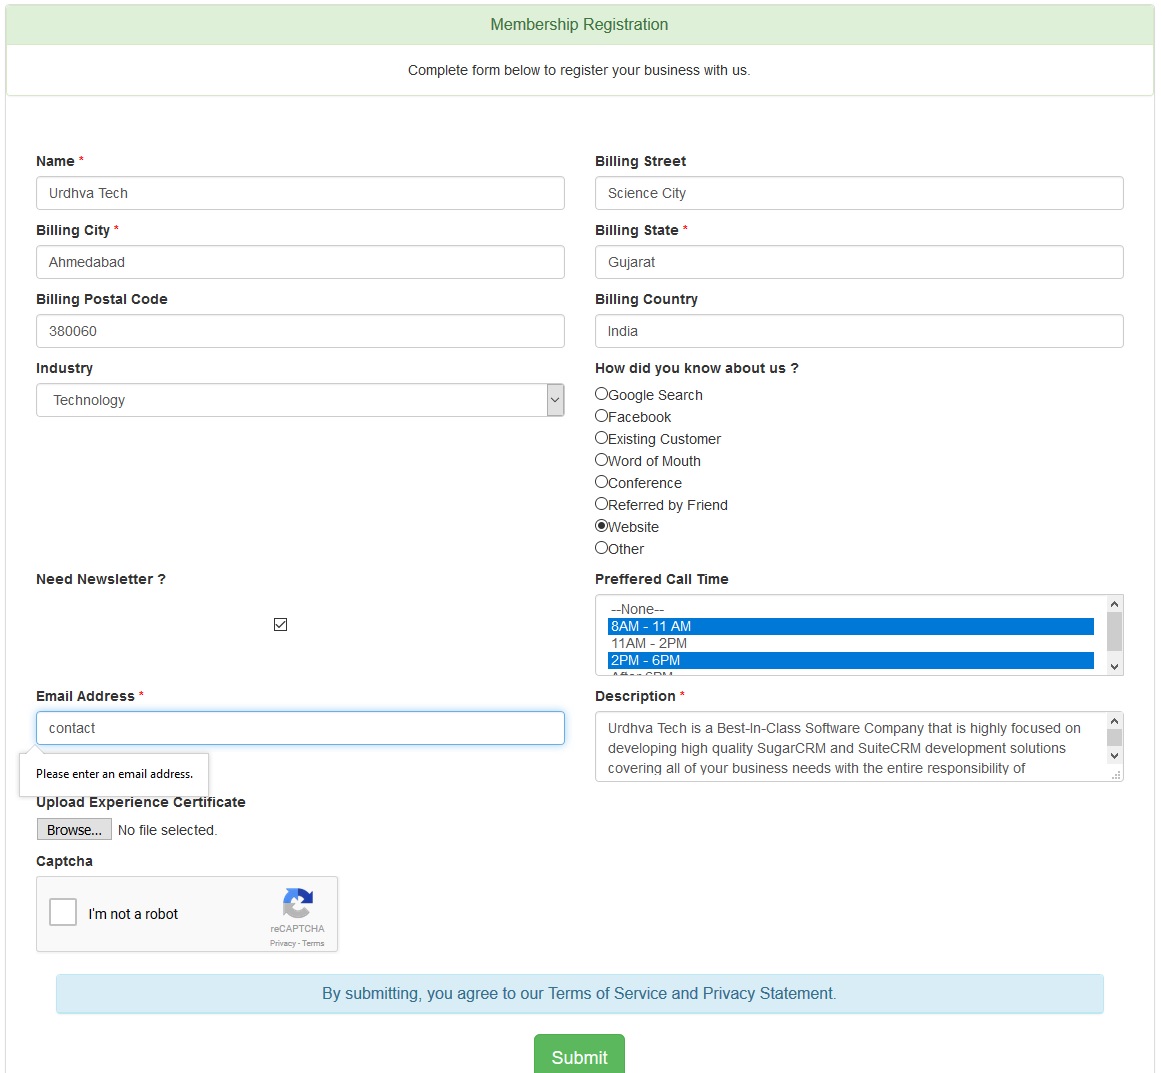
11) Email validation.
12) Once you submitted the WebForm the record will created in your CRM.

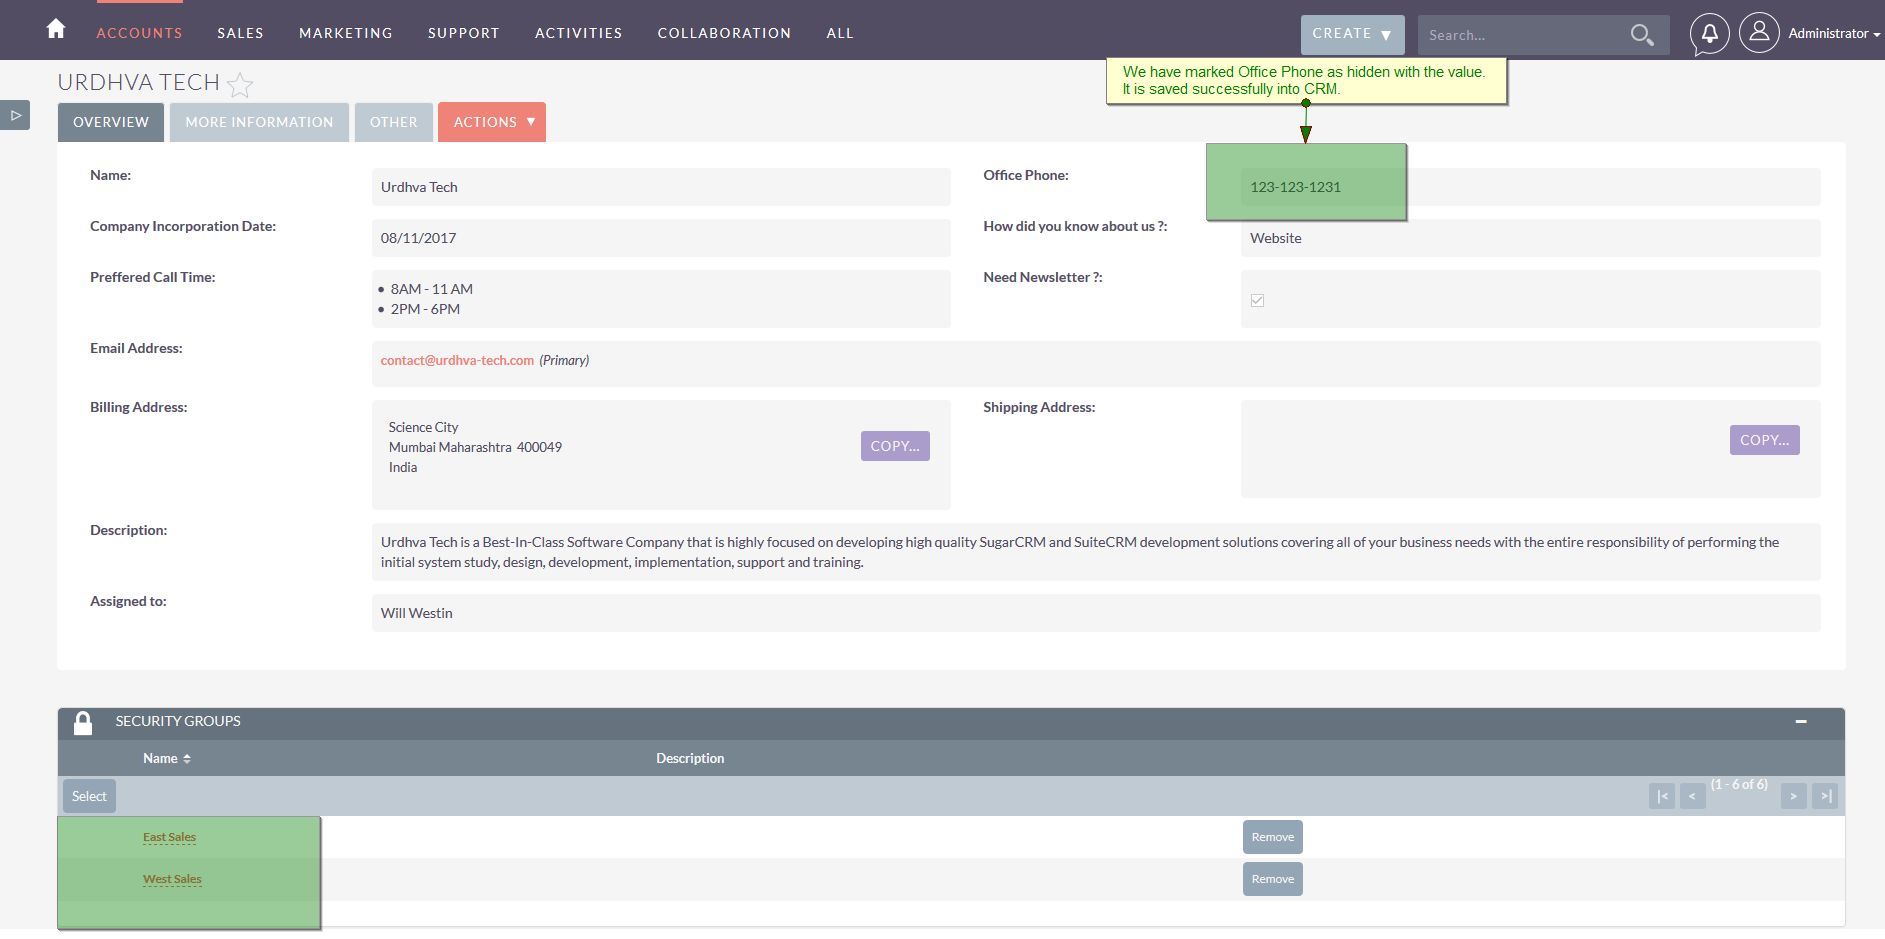
13) While creating WebToModule record, we selected “Security Groups”. The record shown in next screen has the security groups assigned. You can also notice the value of “Office Phone” field. We have marked it as hidden field. It’s value saved successfully into CRM.
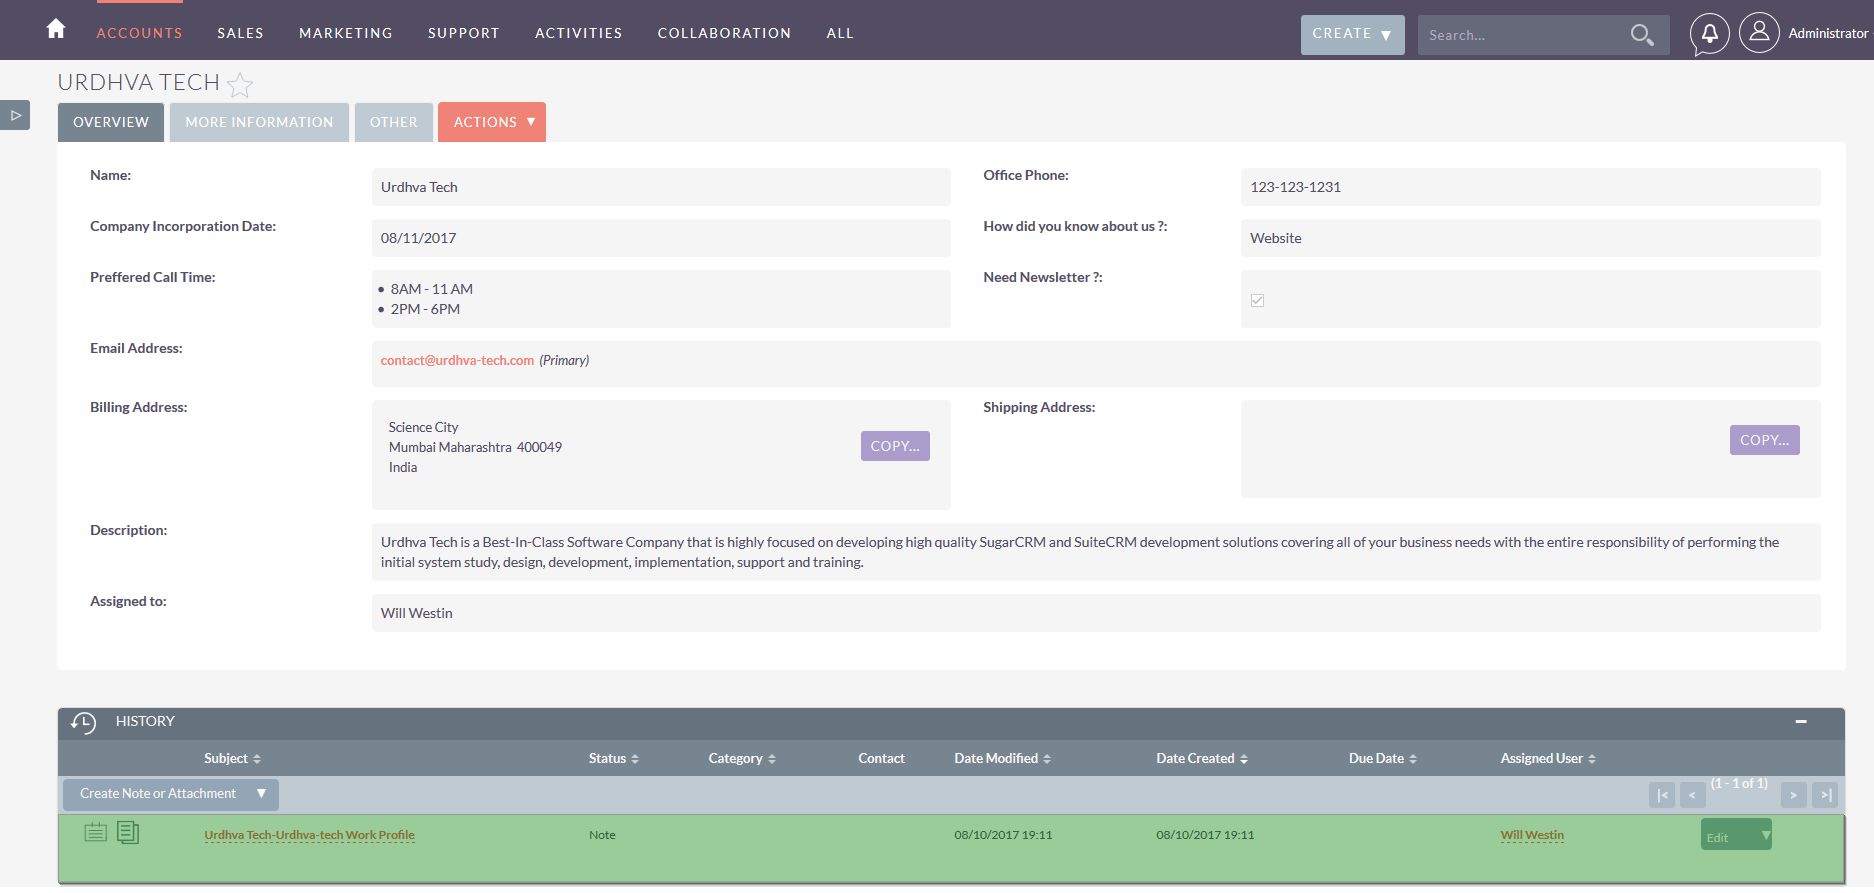
14) While creating WebToModule record, we have included File Control. Notes record is created into CRM and it is relate with parent module that is Accounts. Following screenshot display Notes record into subpanel.
15) While creating the WebForm, We have selected Name and Email Address field for checking duplication. If record exist then it will update else new record will be created in CRM. Look at below, value has been changed for Billing City,Billing State and Billing Postal Code.
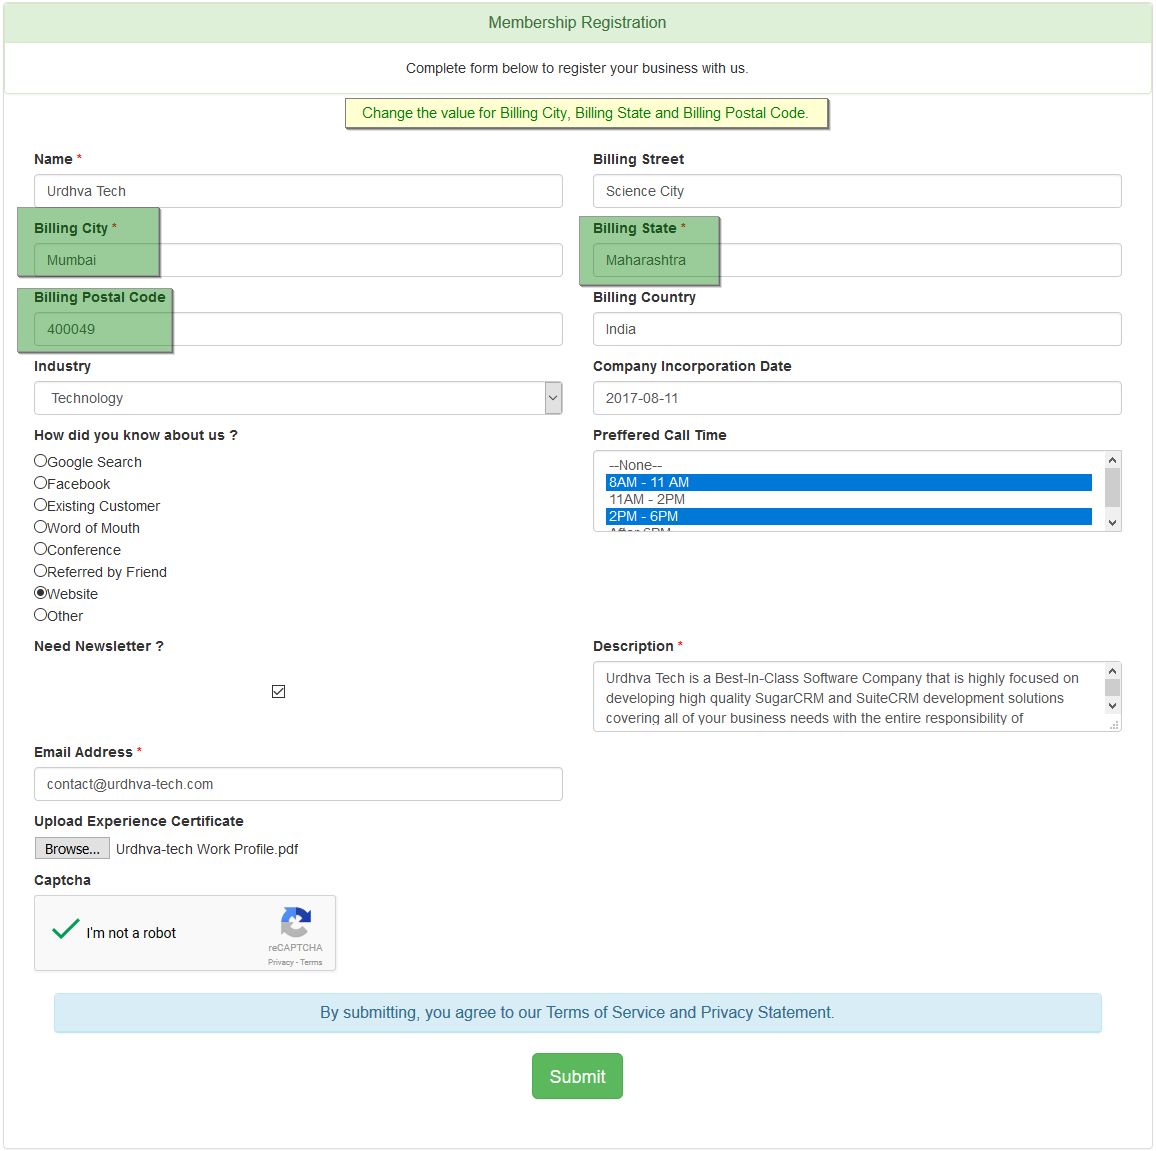
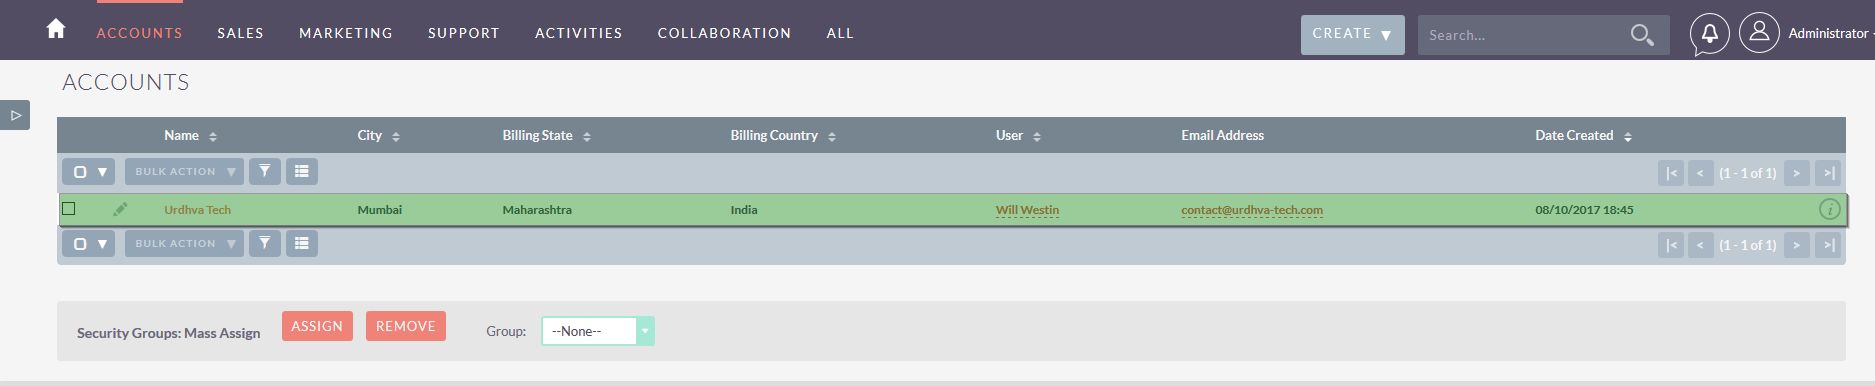
16) After form is submitted, Account record has been updated as follows.
17) Let’s provide different Name and Email Address into Webform. Now new record will be created into CRM.
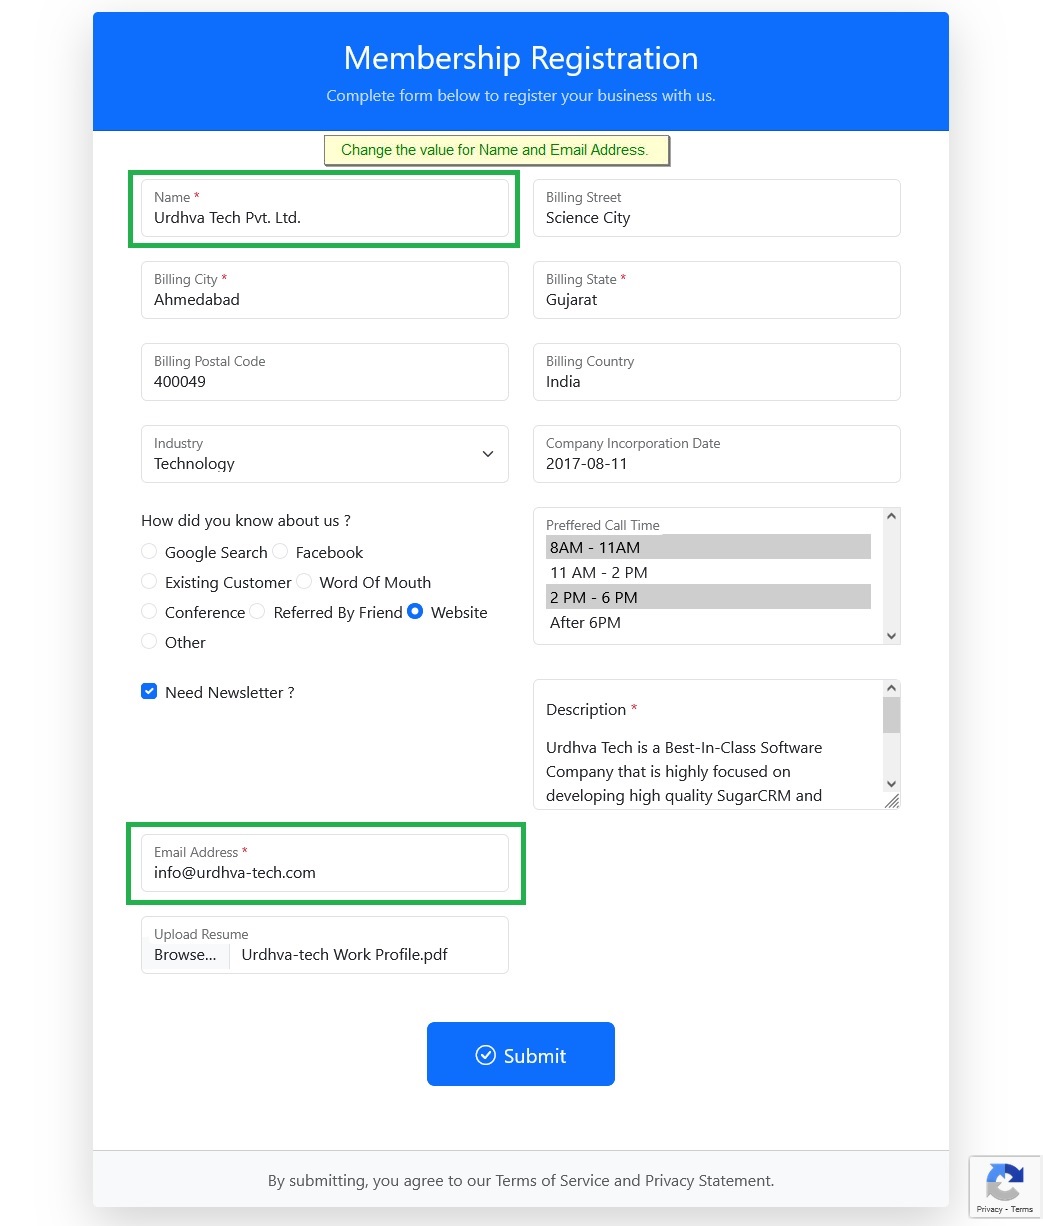
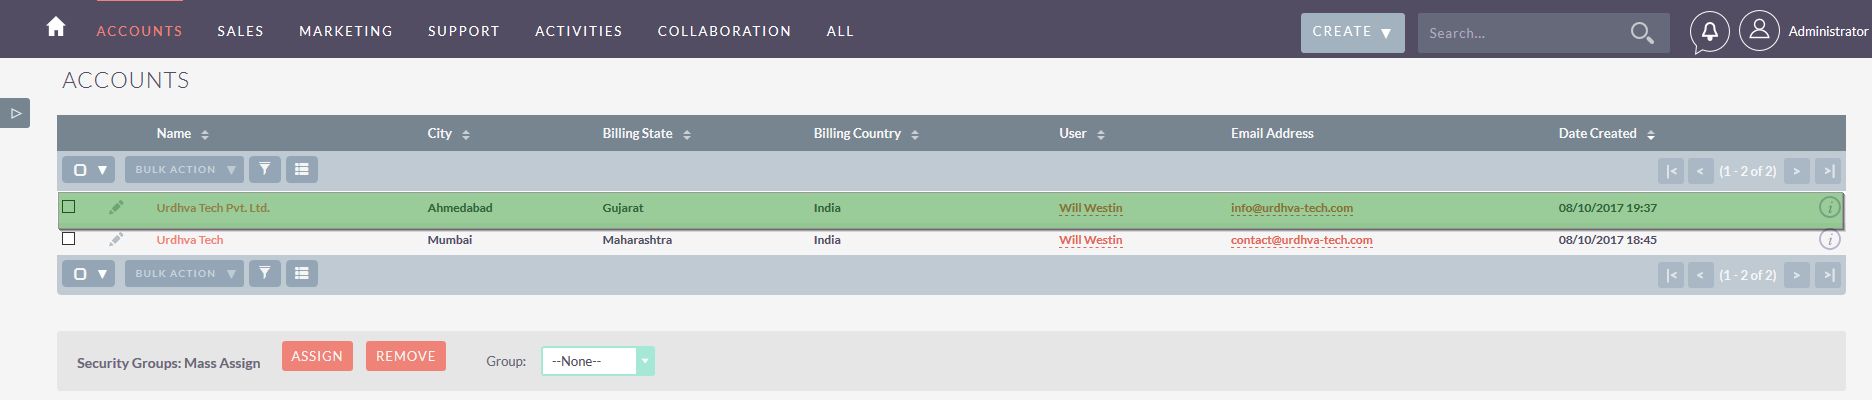
18) New record will be created into CRM as there is no duplication.
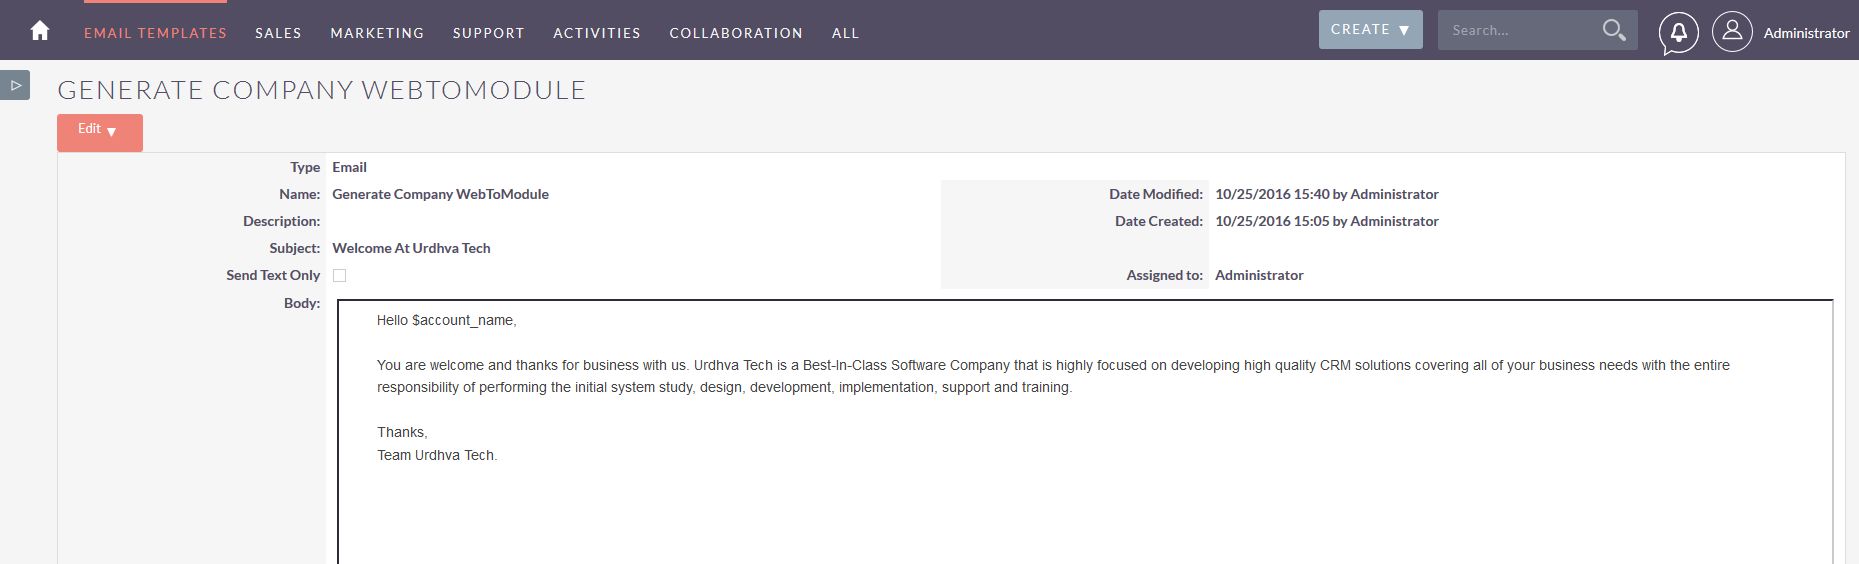
19) While creating the WebForm record, We have selected the Auto-Response Template “Generate Company WebToModule”. Also we have provided the valid Email Address while Submitting the form. So once record is saved, auto generate email will be sent to provided Email.
Email Template record into CRM.
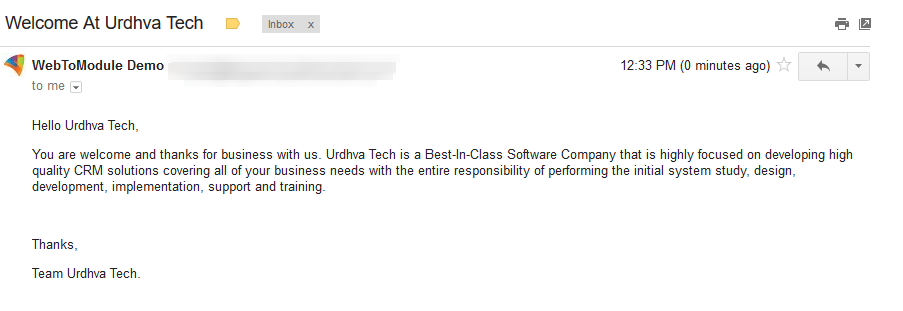
20) The email received by the visitor.
-
"We really appreciate the product and most of all the support services provided by Urdhva. They are exceptional" - seanfdo
Read More Reviews