vProjects integrated with SuiteCRM offers an effective way to manage your projects online. It includes impressive features like an interactive GANTT editor, export to Microsoft Project, and much more.
User Guide
Introduction
Acknowledgements
The Basics
Creating a vProject
Create View
Editing the GANTT intro
Editing the GANTT, enhanced
Extra task information
Status of a task
Resource management
Keyboard shortcuts (for power users)
The Project Tab
Action button project
Project Data
Notes section
Good to know
Baselines
Rules !
Dependencies
Export, Import and cloning projects.
What else ?
Known Issues
The basics
How does it look like?
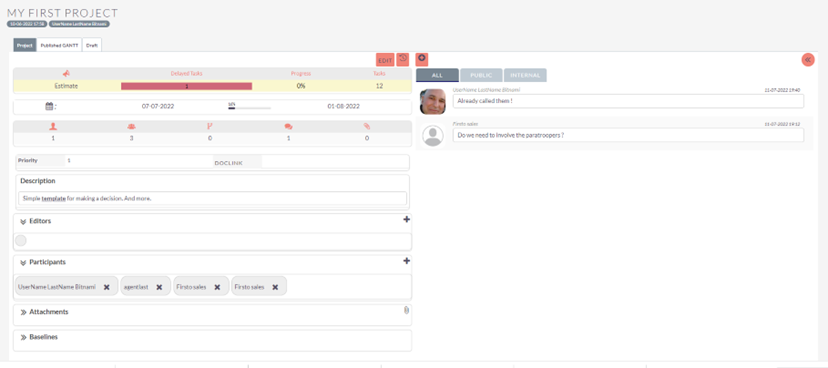
The project presentation consists of 3 tabs. The first tab provides the overall information about the project, as well as the Comment section (vNotes) to the project.
Description automatically generated](Aspose.Words.10f929a2-0c0e-4392-96e8-8b778a530a84.002.png)
The next two tabs show the 2 main GANTTs. The official one, which is the latest published version, and the Draft one, which is the working space for the editor (Project Manager) of the project.
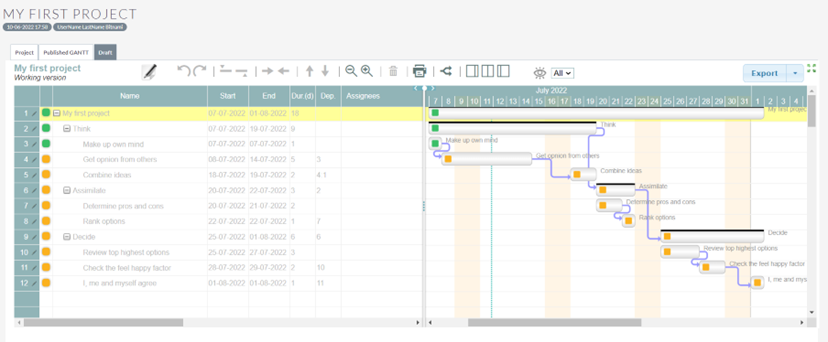
In the next sections we will presenting this is much more detail.
top
Creating a vProject
Let´s start with the beginning.
Login into your CRM and Select vProjects. If you click on it, you will be sent to the List view (which might be empty). One of the options that you will find is “Create vProject”.

Create View
The initial creation of a vProject is very basic. You only have to fill in the Name of the project and an initial indication for the start and end-dates.
But you can add more information.
| Field | Description |
|---|---|
| Name | Give your project a nice name. Don´t forget that you may have different customers and something generic like “launch new product” will not be a big help to refer to later. |
| DocLink | You can add a full URL address where the documentation of your project resides. This can be inside or outside your CRM. The address could be something like: |
| Start Project | Include an expected date for the start. Note that Start and End Dates will be later automatically filled-in when you publish your new GANTT. The first time is only meant as a rough (initial) indication. |
| End Project | See Start Project. |
| Priority | It is useful to set priorities to your projects (assuming you have a number of them). This will be useful for all participants to understand how the priority of a project relates to others. This priority should be really set by management (one level above the Project Manager). At the moment 5 priorities are defined. Typically a company will work on the top X priorities. Projects with lower priorities could be on stand-by, and their priority could be raised when appropriate. |
| Status | A number of predefine values are defined for Status. You may want to work with only a selection of them, but you might want to use more values as your project management processes grow in sophistication. An example use is given below. Note the way projects are handled can vary considerably from one company to the other. For example, the estimation process can be part of the project, or it could be handled in a different way. - - Draft: typically, just meant for the eyes of the project manager. Just starting. - - Candidate: a first project plan is ready. These projects normally are presented to the project board to decide if more resources should be assigned. - - Analysing: People are spending time to come up with an estimate. - - Estimate: in this stage, an estimate is available. The next decision should be whether to move forward with the project. - - Approved: Management decides to move forward. Start of the project can though be set at a future time. - - Developing: Project should be running/executing now! - - Released: Project is ready and delivery is approved. Post-delivery can be part of the project management tasks, or it can be handled in a different way - - Cancelled: can be the result of a not-approved project, customer dropping, … - - Error: you can use this to sound the alarms. If you have some automated work-flow to automatically change the status, this could be a value to draw attention in an urgent manner. - - Suspended: if management decides that a running project should be put on stand-by, this will be the status to use. Typically, this value is to indicate that “no” resources should be dedicated to the project for the time being. |
| Description | You can use the WYSIWYG editor for a nice description of the project. In general, this should not be the place where you keep the full documentation of the project, it would normally provide the highlights. For the full project documentation, contracts, etc. you can use the “DocLink” field. For example an interactive wiki would be an interesting option for this material. |
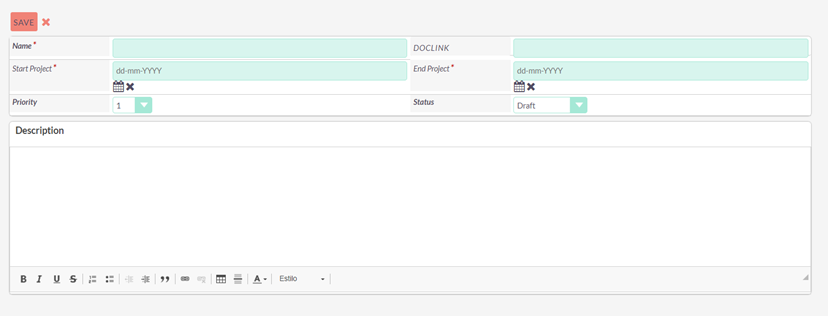
After you fill in the required data, a new project will be created. This means:
- The assigned to user becomes the “editor” or Project Manager (note that the main Project Manager is not automatically presented in the “editors” list. You can add him/her and remove it again, it will not make a difference.
- A draft project plan is created with the dates that you have provided. No published version is created. This is the only time that the published-version dates and the project dates are not alined (again, the project dates at start are just an indication).
Before looking at the main page of the project and review all information, let´s create a more meaningful GANTT.
Editing the GANTT intro
In order to edit the GANTT, you have to be the project manager (the creator of the project) or an editor.
Click on the tab “Draft” to access the Working Version. Initially you will be in “read-mode”. You will notice that the pen on the pencil is in black and white. With the appropriate rights, you can click on the pen and more colours will appear. More importantly, you will be able to edit the GANTT.
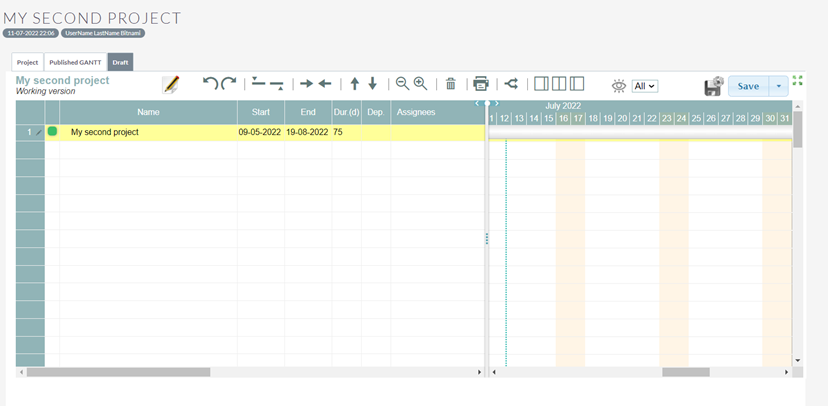
When you are editing the GANTT, it is recommendable to expand the working area. You can do this by clicking on the expand button at the top right hand of the working area, next to the Save button.
You will notice that the first task (which is like the “father” of all next tasks) will be automatically filled-in for you, with the dates that you have provided.
Before adding some new tasks, let´s talk first about the basis of project management tasks, and what has been implemented in vProjects.
First of all, a parent task is a task that has children-tasks. The parent task will be the exact summary of the children tasks (duration-wise). All the tasks after the main task, will be children, grand-children, etc of this first task. You can basically assume that the parent task is the “summary” of the children-tasks.
Besides this Parent-children relationship, there are more relationships that you want to depict in a project plan. vProjects supports 2 relationships (the most common ones!). The FS (Finish to Start) relationship, i.e. the previous task must be finished before you can start with the new task. And the FS with a delay. The FS start relationship is the default one. The FS with delay is defined by adding the delay in days after the dependency. So, for example, and entry in the dependency column of “4:5”, means that this task can start 5 days after task 4 is finished.
As suggested above, vProjects works only with Days. If you have a task that can be handled in half a day, you still will have to define it with a duration of 1 day. Still, you can state in the resources that that the estimated work effort is less, as this is defined in hours. And although this is supported (you can access more data for each task by clicking on the pencil to the left of the task row), we would not recommend to use this feature unless you really are a sophisticated Project Manager, (and even then… ? J ).
With the basics out of the way. Let start using the GANTT. Click on the first empty row and type the name of your new task. Standard duration will be one day (and yes, you will see the duration of the father task change!). Now, go down with the cursor and you will see that a new task entry is created. This is initially created at the same level as the previous one (applies for all but the very first 2 rows). Before you type something in, you can click CTRL-Right (control-key and right arrow) to indent, making this task a child-task of the previous one (if you type and then hit the keys, you will loose the text of that line).

Not a very interesting project, but… it´s yours !!! You can now Save this masterpiece by clicking on the Save Button.
Editing the GANTT, enhanced
Let´s look now at the the GANTT-editor options in more depth. We are using now a slightly more enhanced project as reference.
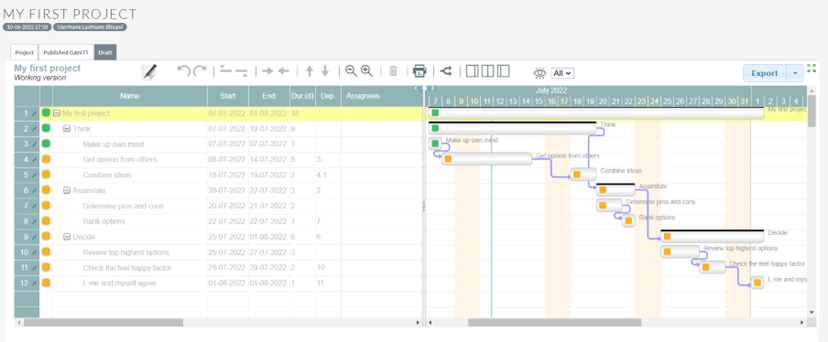
Let´s start with the top-menu:

| Reference | Menu item | Description |
|---|---|---|
| 1 | Project name and version type. | As version-type (subtitle) you can either have: - - Working version (Draft) - - Last published version - - v.X : Name of baseline, whereby “X” stands for the nr of the baseline (more about baselines later) Note that the different version-types will appear in the corresponding “screens”: Draft, Published GANTT (both tabs) and Baselines (-element of the Project tab). |
| 2 | Edit | Editors and Project Managers can click on this to Edit the (Draft) GANTT (or stop editing). Note that only one user can edit at the same time, so the editing user has to exit the edit mode for another to start editing. If a user makes changes to a GANTT, and wants to leave Edit mode, he/she will be asked to Save (accept) or Discard (cancel) the changes. |
| 3 | Undo and Redo | |
| 4 | Add tasks | You can add a task above the selected row or below the selected row. The level of the new task will be the same as the current task. |
| 5 | Indent and Outdent | To increase or decrease the level of a current task |
| 6 | Move task | Move current task up or down |
| 7 | Zoom GANTT drawing | Zooms in and out. Only applies to the GANTT drawing. |
| 8 | Delete task | Deletes current task |
| 9 | Print GANTT | Prints the GANTT. It will be printed over various pages. |
| 10 | Critical path | You can accomplish the same effect using the buttons ( < o > ) just above the area-splitter, within the name row.< |
| 12 | Show levels | You can select up to which level of tasks you want to see on screen. This is helpful to get a better high level view when you work with larger projects (e.g. select only level 1 tasks). When you work with the GANTT, you may have expanded certain tasks. To reapply the selected level, click on the “eye”. |
| 13 | Autosave | If you click on this button, your GANTT will be automatically saved every 5 minutes. |
| 14 | Function buttons | In the Draft version: - - Save: Saves the GANTT. - - Create Baseline: Creates a Snapshot of the current Project. See more about baselines in ** - - Publish: Publishes the project (published version is adapted). - - Export: Exports GANTT in JSON format. - - Import: Import GANTT in JSON format. - Clear: Clears the GANTT. In the Published Version: - - Edit as w.v.: Copies the Published Version to the Draft version (working version). You may want to do that if something has gone terribly wrong while editing the Draft version. - - Export: Exports GANTT in JSON format. - - Export MS-XML: Exports GANTT to MS-XML. Can be imported by MS-Project and compatibles. This may be useful if your customers uses MS-Project (and no import of MS projects is not supported: it would beat the purpose. In Baseline: - - Export: Exports GANTT in JSON format. - - Publish: Publishes the baseline. This might be useful if something has wrong with your draft version, and you created a Baseline after the publishing, including changes that you want to apply. Note that it does NOT change also the Draft version - - Edit as w.v.: Copies the Baseline to Draft. Could be useful if something has gone wrong with the Draft version (including the possibility that your manager does not accept your latest changes and requires you to stick to “the original plan”… oh heaven… ;-) ) |
| 15 | Expand and implode | Makes the GANTT occupy the full screen, and go back to original size. We recommend to work on the GANTT in “expanded” mode. |
Let´s look now at the main working area:

The working area consists of:
- Title row.
- Editor-space
- One line per task
- Number of task
- Extra info of task button (pencil). If a description is filled in, the pencil will be within a white circle.
- Status color of task
- Task name
- -Indented depending on the level
- With expand (+) or implode (-) button if the task has children.
- Name of the task
- Start Date and End Dates
- Note that if any of these dates is calculated, you cannot change it directly (it will be greyed out).
- Duration (in day)
- See comment on dates -- Dependencies
- Finish to start relations, separated by a coma (,). If you want to add a delay you can use taskNumber:nrOfDays, e.g. 4:5 (5 days delay after task 4 is finished).
- Assignees
- When you are ready to do resource management, you can click on the pencil for extra information and add people with or Role “Responsible” or “Participant. If you use this this feature, we recommend that you always put the “Responsible” first, and that there is only one Responsible (only one captain on the ship).
- GANTT Drawing Space
- Incoming arrows if current task depends on others.
- If you hover over an arrow you can see what tasks it connects.
- If you click on the arrow, you can delete it.
- Bar indicating the length of the task, and it will be filled-out according to progress (progress status in extra information: see Editor section).
- When you hover over a task-bar, depending on the limitations you can:
- Move the task (changes start and end dates)
- Make the bar longer or shorter (changes duration)
- Double click: the extra information pop-up will appear.
- Two circles will appear, one at the beginning and one at the end of the bar. You can draw dependencies by clicking and dragging one of them and “dropping” them on another task.
- Click to select, and then delete.
- Status of task
- Outgoing arrows if another task depends on the current one.
- If you hover over an arrow you can see what tasks it connects.
- If you click on the arrow, you can delete it.
- Name of the task.
Extra task information
When you open up the extra task info pop-up (pencil left or double clicking on task graphic) you will see the following:
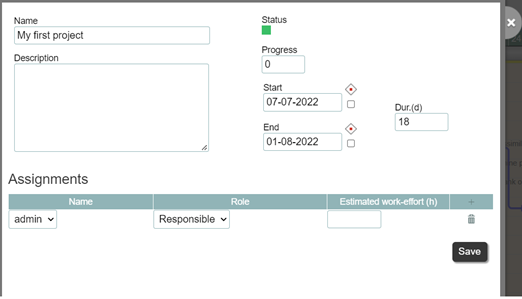
You can change the information here, instead of in the GANTT graphic. You can also add the task assignments. Note that there is a “milestone” concept for the start and end dates (check-box). If you select this, the date will become unmovable. We will be working in a future version to make this more flexible. We actually recommend that you don´t use these milestones for the time being.
top
### Status of a task ###
The status of a task is reflected in the colour.
The colour-coding used is the following:
- Green: active
- Blue: Done !
- Darkish : Failed.
- Orange: Suspended
- White: undefined.
Normally you will only work with Green, blue and Orange:
When a task can start, the system will automatically put the status on Green. Tasks with dependencies on active tasks will be Orange. In theory, they cannot really start.
When you change the status of a task from green to blue, all the children-tasks will also change to blue. The Tasks that were suspended due to a direct dependency to the previous green-tasks, will become now green.
In practice, you could work (partially) on an “orange” task, although strictly speaking, one should not. This depends on the organization, type of project, etc.
The darkish and white colours are reserved. The dark colour is meant for automated processes that cannot be executed.
top
### Resource management ###
Although there are some facilities included for resource management (as part of the extra information and assignees data), we would recommend that you start your first Projects without this. Resource management is a complex topic that will need quite some automation to offer real added value.
We do plan to introduce in the future a separate version for companies that manage large projects and that require resource management. We will provide for this more automated processes, time-keeping facilities, etc.
top
## Keyboard shortcuts (for power users) ##
The following keyboard shortcuts are supported in the “Editor” are:
- CTRL+UP: move current task up.
- CTRL+DOWN: move down current task.
- CTRL+LEFT: outdent task (decrease level)
- CTRL+RIGHT: indent task (increase level)
- CTRL+Z: undo
- CTRL+Y: redo
- CTRL+DEL, CTRL+BACKSPACE: delete task
Note that all these actions are also supported by buttons in the GANTT menu.
The project tab
See below an example of how a project could look like.

You can see here the following areas:
- Title of the project:
- Name
- Two pills: date created, User that created the project (and thus Project Manager)
- The tabs to navigate to the GANTTs
- Action buttons: Edit and Change log.
- Left column: project data
- Right column: comments (vNotes) from Project participants.
top
## Action button project ##
When you click on the Edit button, you will notice:
- Dashboards are temporarily hidden
- You will see a bit more information appearing (like the Name of the Project).
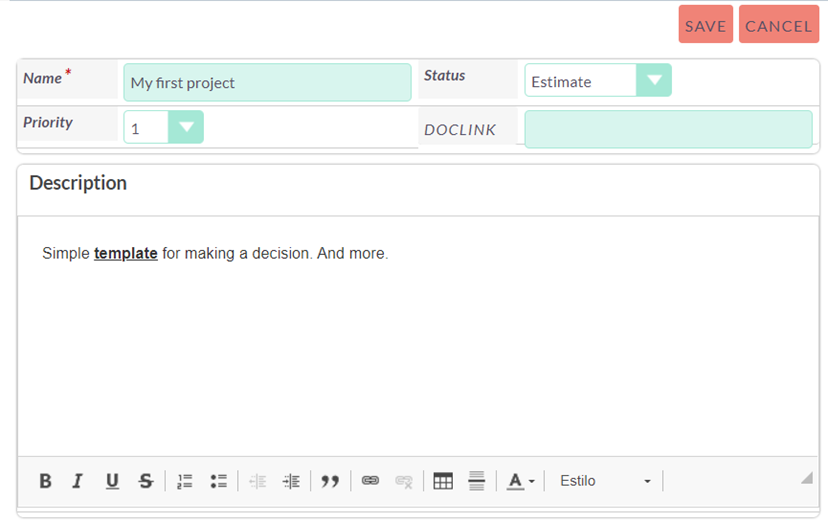
Make the required changes and save (or cancel…).
The Change-log button will present in a pop-up the changes made to the audited fields.

We added some “>>” characters in the presentation to indicate that the old-value changed to the new value…
Project Data
There is quite some data included in this section, so let´s look at the different elements independently.
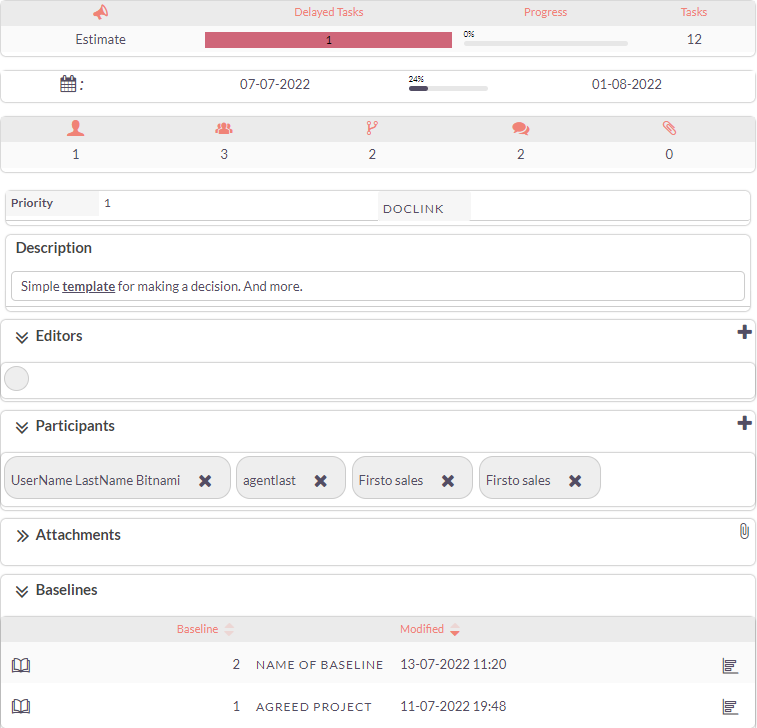
The first three sub-areas, are dashboards that provide overall information about the project.

Note that the information that is provided here relates to the Published version. Changes made to the Draft version are NOT reflected in the main Project tab.
Status dashboard:
- Status of project
- Delayed tasks (number)
- Progress: indicated how many tasks have been completed.
- Note specifics about the task (duration, resources) are NOT taken into account. Still it provides an useful indication.
- Tasks: number of tasks of the vProject.

Timeline dashboard:
It provides the start and end dates as defined at the creation of the project, and after that, as defined in the published vProject. The progress bar is computed from the start date, current data and end-date, so it shows how far, timewise, one is into the project. Normally, the time progress and the task progress should be rather alined.

Participation dashboard:
This dashboard gives an indication on how “hot” the project is. The different elements are:
- Editors (number) (takes into account the Project Manager, who does not have to be on the list)
- Participants (they become automatically resources that can be added as assignees to the GANTT).
- Baselines (number)
- Comments (number)
- Attachments (number)

The next area in the Project page shows additional information about the project:
- Priority
- Link to the document (if something is defined)
- Description of the project

This is part of the Project Data that you can Edit when you click on the Edit button (see section on Edit Project).
After this you can find 4 Subpanels:
- Editors
- Participants
- Attachements
- Baselines
Editors: You can add an Editor by clicking on the “+” button in the subpanel. You can just type in the name of the person, or if you want to add yourself, just click on the icon below. Don´t forget to click on Save !
Note that only the Project Manager (the creator of the project) and the Editors, can change the GANTT.
If you add an Editor to the list, the user will have to log-out and log-in again for the new rights to be effective.

Participants: similar mechanics as for Editors. Participants are resources for the projects.
Attachments: You can add attachments to support the documentation of notes or overall project.
When you click on the Add Attachment button, a pop up screen will appear. Click on the select file to pick a file, and change the name to something more appealing. After that, you can upload the attachment by clicking on the upload button. 

Baselines: You can create baselines from the GANTT elements. From here, you can access them to review and take potential action on them.
Notes section
The notes section makes use of vNotes for the team to interact verbally.
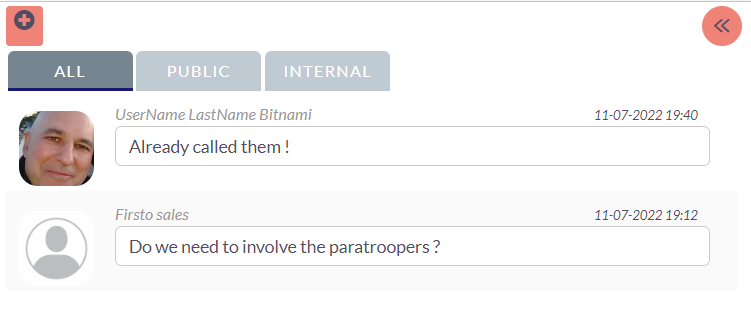
We can distinguish here 3 sections:
- Action button row
- Type of Notes (only visible for a specific role)
- Notes themselves.
Action button row: Click on the Add comment icon (“+”) to add a comment. You will get a WYSIWYG editor. Check out the vNote documentation for further information.
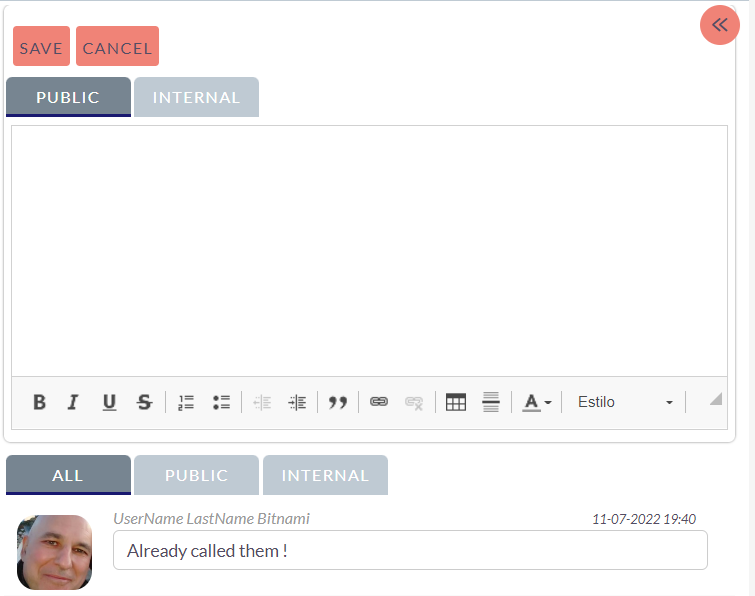
You can also expand the Notes section by clicking on the “expand” and back with the "retract" button.

The Notes section shows the picture of the person that created the note, name and Date.
Note that the “Public” / “Internal” facilities are ONLY available for users with the role “agentvnotes”. This role is automatically created by the vNotes package.
Good to know
The intention of this manual is not to present best practices on Project Management, but we would like to offer you some tips.
top
Baselines
It´s a good habit to create regular, meaningful, baselines. Make sure that you include at least the first agreed/approved project plan so you can refer back to it (may be painful, but… ).
Other baselines could be saved for:
- Reaching a specific milestone (not referring here to the milestone concept implemented), for example: positioned roof on the house.
- Intermediate approvals needed to progress with the project.
- After any Change Request approved by the stakeholders, basically creating a new “agreed project plan”.
Rules !
Like in all good things in life, there are certain rules. You will notice that:
- Suddenly a lot of things change when you for example move just one task. This will happen if you move for example the first non-parent task in your GANTT. It´s supposed to…
- Sometimes you cannot move certain tasks or create new dependencies. The system will give you an indication why it cannot do so. For example because there are already dependencies that would be contradictory.
If you see something that you had not expected, remember that you can always perform an undo (GANTT action, or CTRL-z) to set it back.
Dependencies
Some People will say that all tasks should have another task that it depends on i.e. all tasks should have a dependency (except for the first task). The explanation for this is that else it will be tough to manage.
vProjects introduces a kind of “summary”/parent task (any task that has children: i.e. all parent tasks should have at least 2 children, or else why have a parent task ?). So, if the parent depends on a task, then all its children also depend on that task. Easy and visually more processable ! Taking this into account, the above “rule” could apply, even though not all tasks would have a direct incoming arrow !
Continuing with dependencies: although everyone can have its methodology, be careful in creating dependencies between tasks that are not at the same level. This could be an indication that your Project Plan may need some rearrangement.
Export, Import and cloning projects.
You can export a full Project. Note that the IDs will be kept, so this means that you can ONLY import it back on a new installation.
If you want to make a “copy” of a project, you clone it.
vNotes will not be exported automatically. If you want to keep the vNotes, you will have to export and import them separately.
What else ?
We are working on a “Teams” offering, that will include vProjects, Project Work-flows, Project Specific Reports, Management Control Panels, Time management, etc. targeting larger enterprises with more sophisticated needs. This overall package will be commercialized separately. Let us know if you are interested!
Known issues
Nothing major known…

