Webhooks - Examples
Installing webhooks is simple. It takes three simple steps:

1) Create a Webhook Script
The purpose of this step is to create a URL that we can provide to the SuiteCRM Store. One way to do this is to create a simple script and upload it to a web-accessible server. You can do this in any web language or framework. For this walkthrough we’ll be using PHP.
Create script.php. We'll start with this simple script and add more to it soon: https://gist.github.com/chadhutchins/6126555
Now save and upload your script to a web-accessible server. For example sake, I uploaded mine to http://yourwebsite.com/path/to/webhooks/script.php
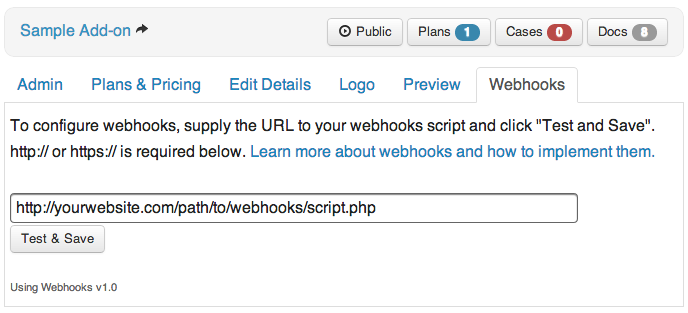
2) Enable Webhooks on the SuiteCRM Store
Now that we have a valid URL to your script, you need to go to the “Manage Add-ons” page on the SuiteCRM Store. Once there, click the add-on you’d like to enable webhooks for and find the “Webhooks” tab. Provide your URL and click “Test & Save”. This will send an HTTP Request to your URL. If there is a successful 200 HTTP Response, it’ll tell you “The webhook passed the test!” and you’re all set!
3) Write code for Webhooks
In the sample code below, there are three primary things you need to make sure work:
Retrieve the data sent from the SuiteCRM Store - Webhook events are sent to your webhooks script via HTTP POST Requests. The body of the response is a JSON string. Simply grab the body of the request and decode it to a PHP object. (Lines 3-7)
Now that we’ve received the event data, we need to figure out what event just occurred and route it appropriately. The response represents an event object. Determining which event occurred is as simple as looking at what the $response->webhook value is. To handle specific events, simply create a switch/case statement or if/else statements. Whatever is convenient for you. You can implement as few or as many of the available events as you like. (Lines 11-32)
Lastly, write your custom code. For each event you are implementing, write the custom code you’d like to be executed when the events occur. To keep things clean, I created a single static method for each of the events and the corresponding class is below, but you can implement this however you like. This is only one way to do it. We’ve created the platform to be as simple and flexible as possible.
Example webhook script: https://gist.github.com/chadhutchins/6126648
There are a few fundamental things to keep in mind as you’re implementing Webhooks:
1) Webhook URLs are specific to individual Add-ons
You are able to provide a unique Webhook URL for each individual add-on. If you sell multiple add-ons, you can have them all point to the same webhook script if you like. If you do this, you will need to be sure to check which add-on the event occurred on before taking any action. Too make this easy, see the next point...
2) Every Webhook Event is delivered with an Add-on object that is specific to the Add-on the event occurred to.
In the example code above, if you were to use a single webhook script for multiple add-ons, all you would need to do is check the $response->data->addon->id or $response->data->addon->name to determine which exact add-on the event occurred to.