Use the Inventory Management integration for SuiteCRM to successfully oversee your product supply within the CRM – all without the need for expensive, off-the-shelf software. Complete your business cycle: from quotes or invoices you can stay on top of your inventory flow.
Installation Guide
1. Installing the Add-on
1.1 Upload and Install
Install works the same as most any SuiteCRM module. Download the zip file from your Downloads page. Then install using Module Loader within SuiteCRM.
1.2 License Key
Right after installation is complete you will be redirected to the License Validation page. Copy and paste the key you received when purchasing the module into this box and click on "Validate". Once successful click on Continue.
1.3 Post Install
After installation run the following:
Admin->Repair->Quick Repair and Rebuild - Execute any SQL after the page loads Admin->Repair->Rebuild Relationships Admin->Repair Roles Admin-> Rebuild JS Grouping Files Admin-> Display Modules and Subpanels and Drag and Drop these modules: Warehouse, Stocks, Transactions and Transfers to Displayed Modules.
2. Initial setup
2.1 Configure the Administrator
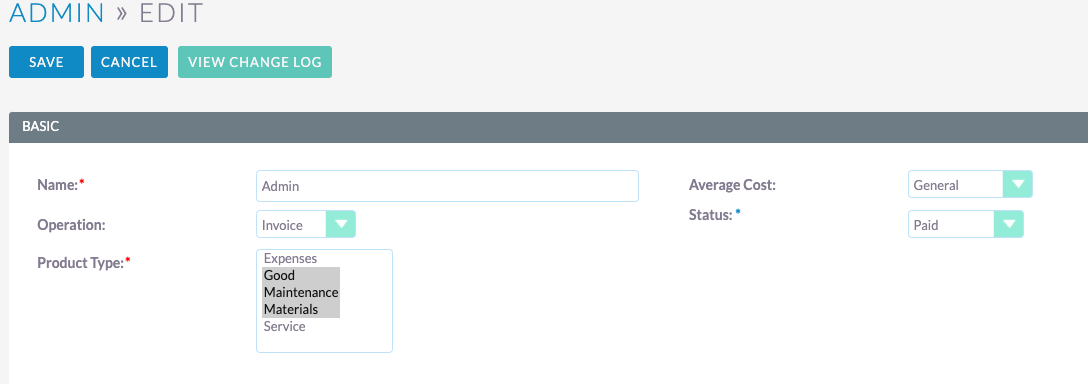
Go to Admin -> Inventory Management Settings

2.1.1 Average Cost: You can choose between "Warehouse" and "General".
The cost type per warehouse is individual per item in each warehouse, while the general cost type is global for the item in all warehouses. Example: if you have the cost type = "General" and enter a screw in Warehouse 1 at $ 2 and then enter another screw in Warehouse 2 at $ 4, the system averages the two screws and in the two warehouses and puts them in both at $ 3. But instead, if you have the cost type = "Warehouse", with the same example, each screw retains its value in the warehouse you entered.
By default this field has the value "General"
2.1.2 Operation: You can choose between "Invoice" and "Quote".
Here it is determined with which document the products will be issued. These are exclusive, meaning that only one of the two must be chosen. When you choose "Invoice" only with the invoices you can do an automatic inventory output. The same happens when "Quote" is chosen, this field works in coordination with the "Status" field which is explained in the next point.
By default this field has the value "Invoice"
2.1.3 Status: You can choose between the states of the quotes or invoices, depending on what you have chosen in the "Operation" field.
This field complements the previous one. If you choose "Operation" = "Invoice" and "Status" = "Paid", only when an invoice is in that state and you enter products, they decrease from stock when you save this invoice.
By default this field has the value "Paid"
2.1.4 Product Type: You can choose from several options in the "Product type" list.
In this field, you choose which types of product the "Operation" + "Status" configuration acts on. Only the product types chosen here will be affected as part of the inventory output process from a quote or invoice.
By default this field has the value "Good"
2.2 Set up the first Warehouse
Once you have set up the administration section, is required to set up your first warehouse. In order to process works, requires at least one active Warehouse.

Go to Warehouse -> Create and complete all the fields. You can create a lot of warehouses as many as required.
2.3 Add the Warehouse field in Quote or Invoice Edit View.
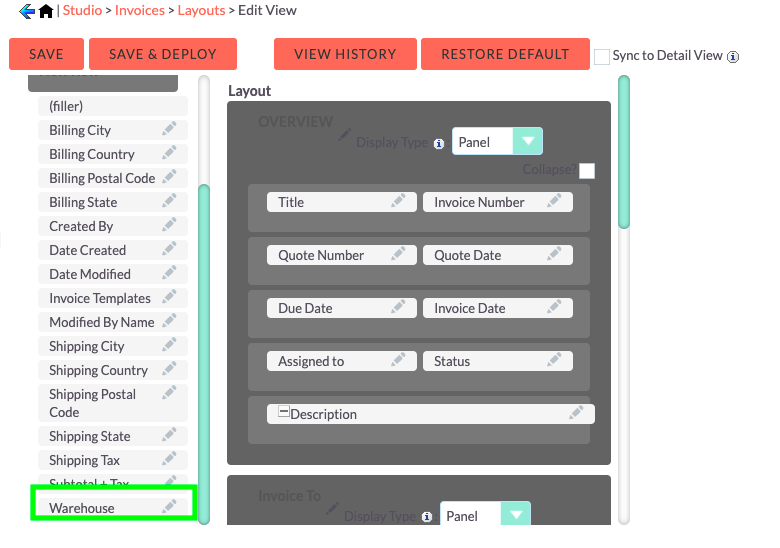
Finally, in order to make the inventory affected by the transactions made by the invoices or the quotes (as configured in section 2.1.2 above) This field must be included in the Admin -> Studio -> Invoices / Quotes -> Layouts -> Edit View

Drag and Drop the "warehouse" field into layout. This field is automatically created in quotes and invoices modules at the time of installing this add on and is mandatory for the process to work correctly.

